

A DIY Vintage Airstream Remodel

Gallery and video at the end of this post!!
With the spread of COVID and the consequential lockdown we all experienced starting March of last year, we quickly learned how important it was for us to escape our homes every so often. Especially if that could be done while keeping distance from others and experiencing nature. Desperate to do so, I commandeered a camper and forced my family on the road. Here’s what happened.
By May I was basically losing my mind on a daily basis, suddenly home with 3 high-needs kids ages 13, 10, and 6 and a now working-from-home husband, after the long slog of online schooling wrapped up. We are a relatively “social” family who like to get out of the house at least on a weekly basis and seem to be the house all kids (and sometimes adults) accumulate. So being isolated and unable to scratch that social itch as getting rough. I began daydreaming about wandering the earth. swimming in oceans, climbing mountains, exploring different places within a drivable distance. I started looking at used campers, the perfect solution for my wanderlust, I thought. But apparently I wasn’t the only one feeling the at-home squeeze because there were none to be found for miles and I was left frustrated and annoyed that the way-too-much-work “tent camping” would forever be my option.
Until I remembered that my sister was the lucky owner of an old Airstream camper. An Airstream that was presently rusting away, unused in Idaho after she and her family made a somewhat sudden move for a new job in California. So I texted her and asked about it. My sister is incredibly nice and supportive and seemed happy with my “offer” to go get the thing and fix it up. The camper is a 1969 Globetrotter that was purchased by our grandparents for use as a place to sleep when they had to travel from one side of Idaho to the other to visit their potato cellars. Yes, I know. So very IDAHOAN of them. They’d pull it right into the cellar and hook it up and sleep in it a couple nights at a time. I think they may have taken it on more exciting trips too though knowing my workaholic grandfather, I doubt it was often. Anyway, when they got older and traded up for a larger, fancier RV, my dad bought it to use on vacations for my family. I only have one memory of using it on a vacation, and believe it was more often used for a guest room when our many aunts, uncles, and cousins would come in for the holidays.
Fast forward and eventually my older sister inherited it after my brother had lived in it for a while on my parent’s property. She and her family used it as a glorified tent a few times, as by then it had fallen in to some state of disrepair and didn’t have functional plumbing or electric. They did began to try and shine it up, cosmetically and had big plans to remodel it, but as life would have it, they ended up selling their business and moving to California to pursue a new opportunity, selling their “tow vehicle” in the process. She left it with a friend who had room to park it and there it sat, until I texted her about it over the summer.
The friend was interested in buying it if my sister wasn’t planning on picking it up anytime soon, but my sister (thankfully) didn’t want to sell it because she was determined to one day do something more with it or at the very least, keep it in the family. We discussed it and she agreed to let me go get it and haul it home, fix it up, store it, and use it, until the time when she got a tow vehicle and wanted it back. Then we’d simply make a calendar of sorts and trade it off between each other or share with other siblings if they were interested in taking a trip.
It took some convincing to get my husband on board with trekking across the country (Houston to Idaho is a good 3 day drive) with 3 kids and a dog to go pick it up, but I filled his head with grand plans of hiking, biking, fishing, swimming, and becoming a “camper” family and soon he conceded. We packed up, and headed north, stopping along the way to check out beautiful places like the Rockies of Colorado and the Salt Lake Valley. It was an amazing trip for the most part… except that our old truck broke COMPLETELY DOWN on a mountain between Colorado and Utah, forcing us to leave it for scrap and rent THE LAST CAR from a small resort town which, thank god, was a minivan. In Salt Lake, my sweet younger sister and her husband watched kids for a day so my husband and I could shop for a new car and we ended up driving to Idaho in a new-to-us Nissan Pathfinder that fit us all comfortably and had the tow capacity for the Airstream we were about to haul back.
Getting a hitch put on our new car was also a feat as it seemed everyone and there grandmother were out buying campers and getting hitches leaving NONE to be found anywhere between Idaho and Utah. Lucky for me, I know people in Idaho and was finally able to secure the proper parts and a guy to install at the last minute, before we needed to head home for my husband to get back to work.
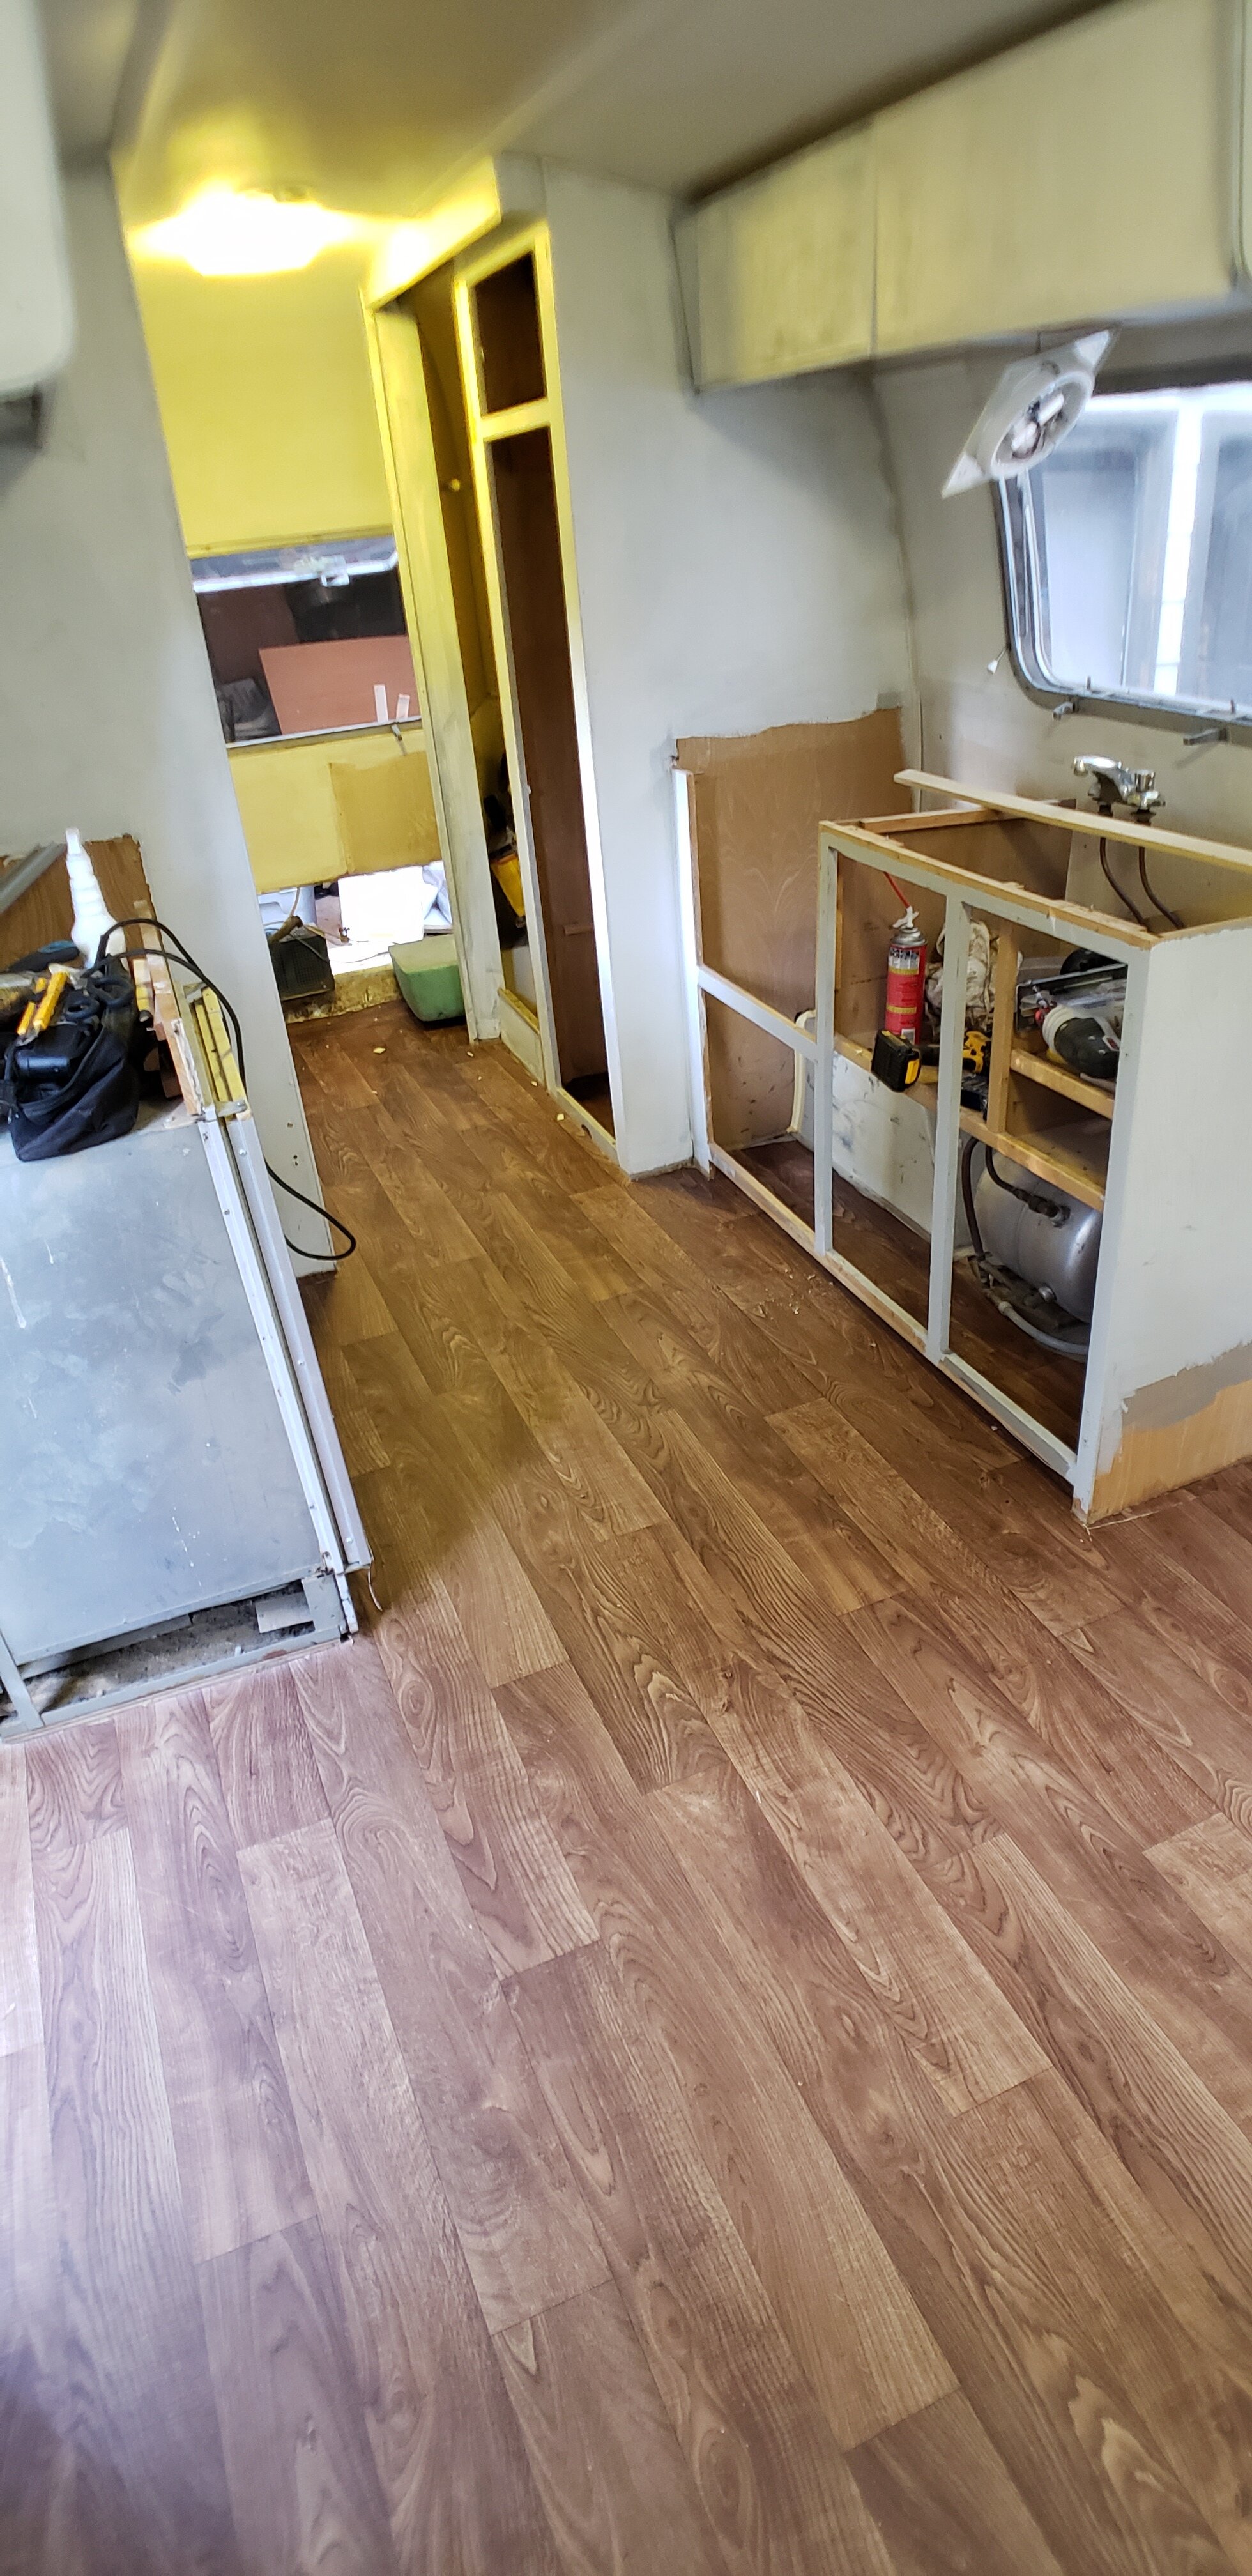
Upon seeing the Airstream (which I hadn’t seen in years) it was evident that more would need to be done to it than I originally anticipated. I HAD NO IDEA. SO much more was needed than I thought, and there were definitely times in the remodeling process when I wanted to light a match and burn it to the ground. When we finally towed it home and I started tearing things out and inspecting all the bits and bobbles, I realized that the water tank (a custom tank in an expensive plastic which apparently doesn’t bond well with others) had cracked, that the plumbing was just wide open to nothingness in the back where the toilet used to be, spewing water out the back end, the subfloor was completely rotted through, allowing a nice little entry point for all kinds of critters but mostly birds (we counted 8 dead birds when all was said and done), the counters were warped, the seats were rotted in spots, there was leaking from the windows, the flooring was peeling up, there was no A/C or working heat (A/C is a MUST for southern camping), and a million other little problems that I never accounted for or thought I’d have to fix before the thing was roadworthy. Oh also, we got pulled over hauling it home because only the left turn signal worked and we had no functioning tail lights. It also had the original range (a stove/oven combo with 3 burners that ran on propane) and the original refrigerator. Luckily, the interior electrical seemed to work and the refrigerator booted up and got ice cold, which ended up being a huge plus because getting a new fridge that runs on electric or propane is very expensive (not within our meager budget).

First thing we did was basically remove everything that was ruined and or not functional for our needs. We removed the countertops (kept the cabinet bases), cabinet doors, flooring, closet door, range, heater, broken overhead light fixtures, and old pipes that were no longer needed since the septic had been removed years ago.
Thats about the time we realized how many issues we really had to deal with before we got to the fun part of “making it look pretty”. We sucked up all the dead birds and feathers and cut out the rotted flooring. Replaced it with 3/4” ply subfloor, after fixing the plumbing which entailed capping the pipes to the missing septic with shark-bite end caps and patching in PEX where the old copper pipe just had too many pinhole leaks. Honestly, it was a patch job and eventually, we will likely need to gut the plumbing and replace the whole system with PEX. But for now, the old pump is still kicking and it seemed like the quickest way to get this baby running. Oh, I should mention that we were on a time crunch once we landed home with our new project. Our HOA only allows us to park a camper on our driveway for 30 days or they will fine us. So, not wanting to try and reconstruct the thing at a storage facility, we were working our asses off to get humpty dumpty back together again asap.
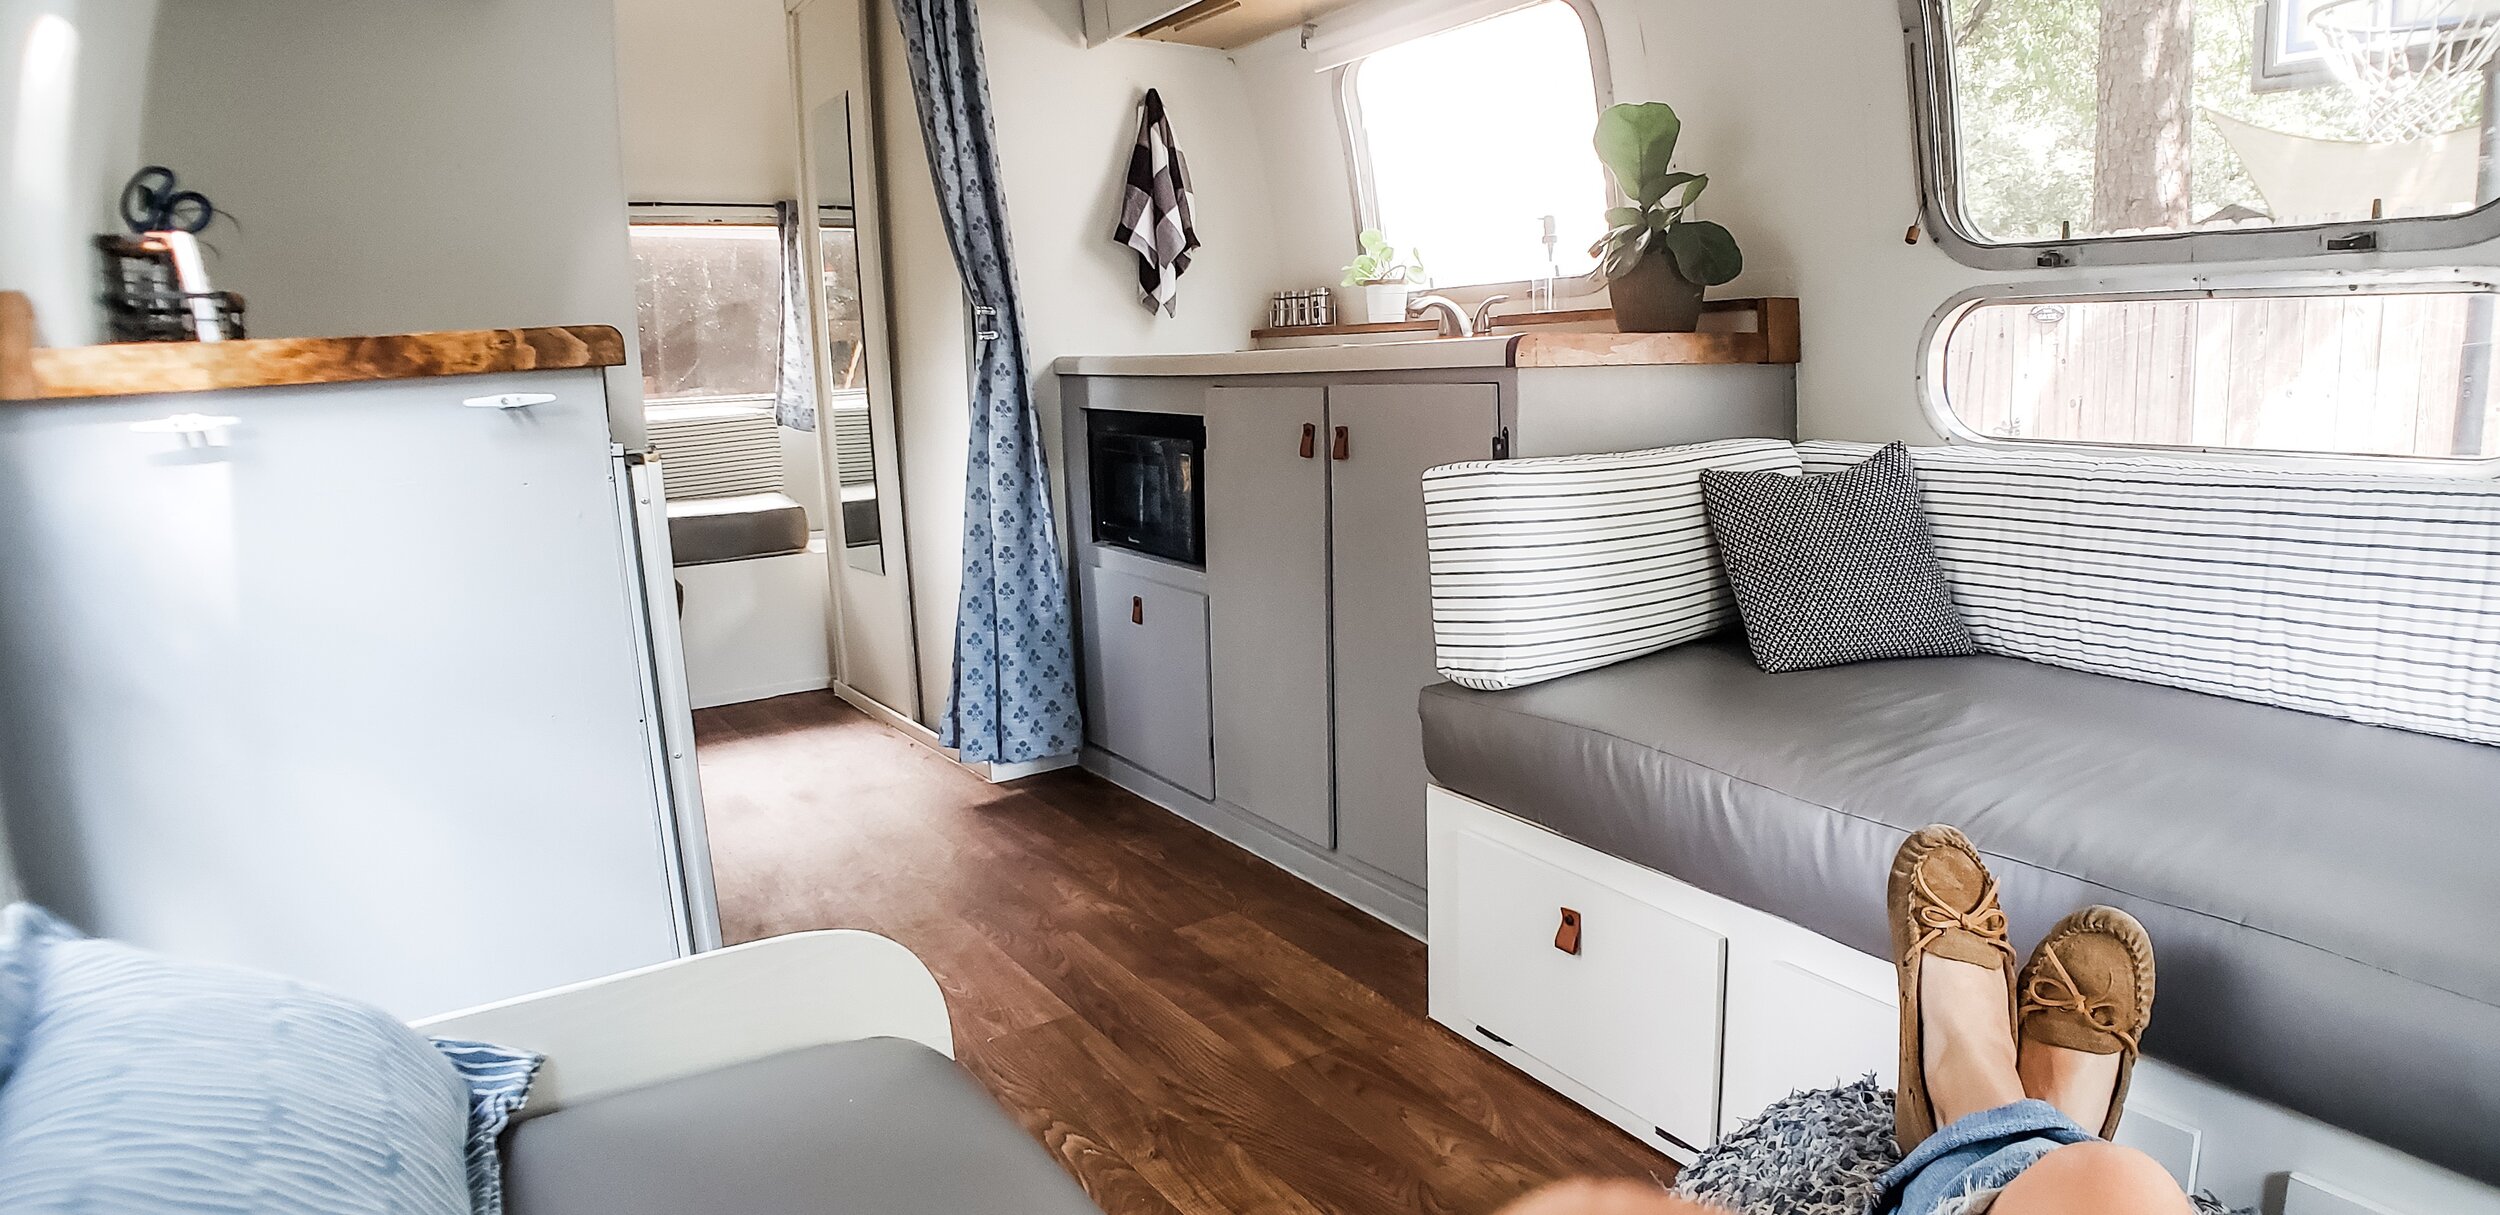
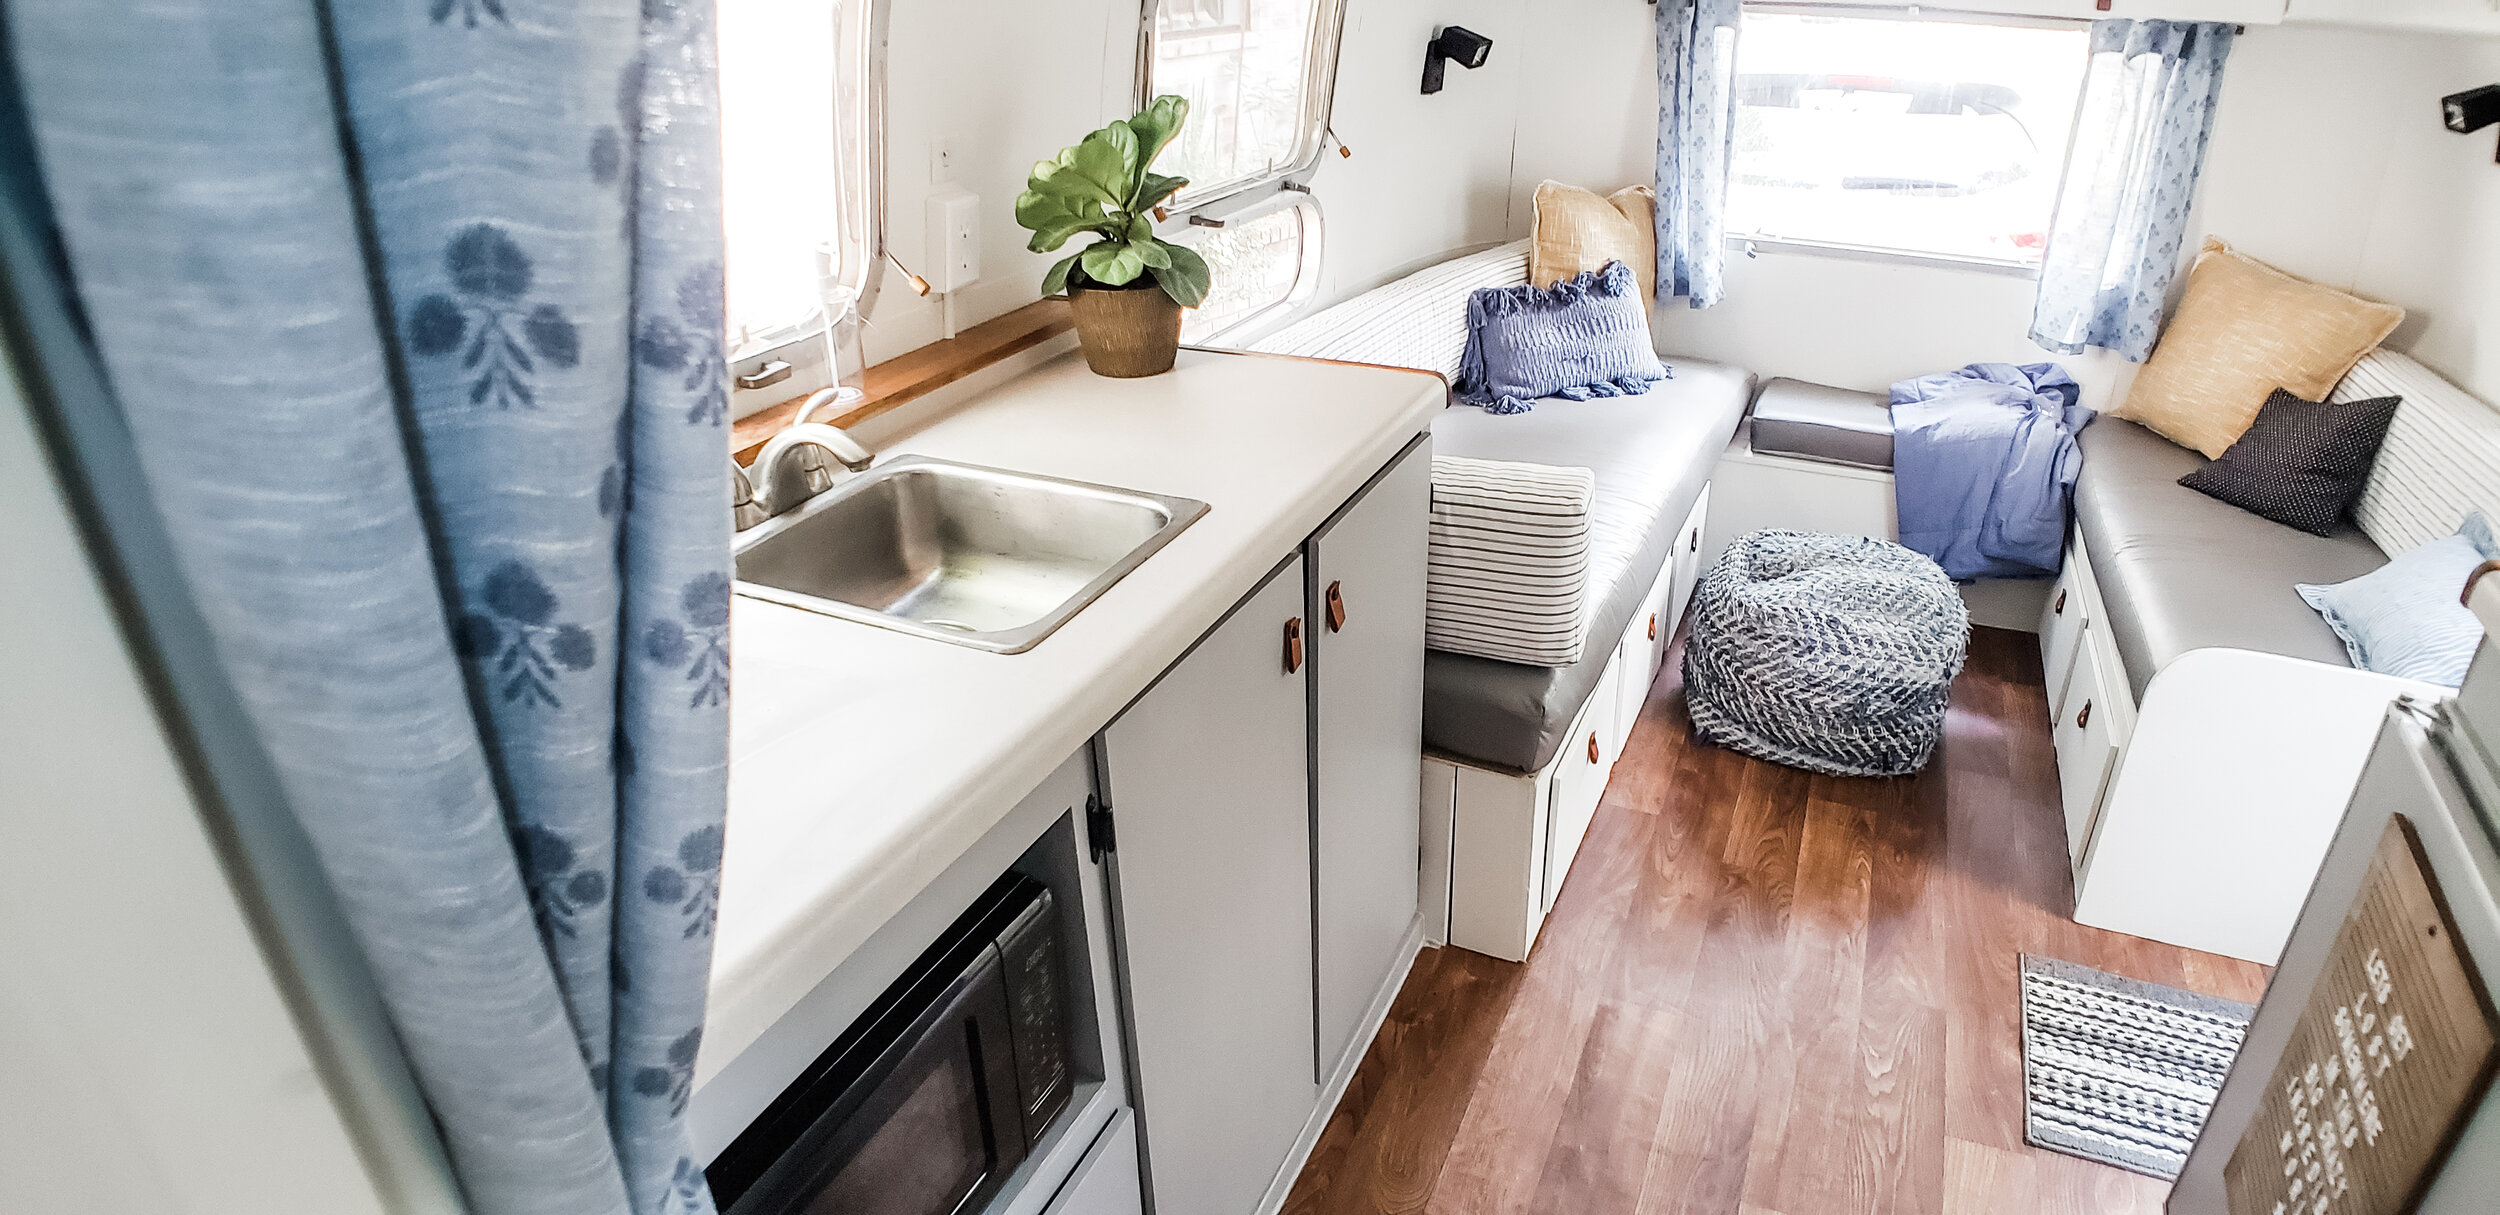
After the plumbing was “fixed” and the subfloor was down, I found a roll of wood-look vinyl sheet flooring off a shady guy on Facebook Marketplace. It cost me $80 and was relatively easy to install. I used indoor/outdoor flooring adhesive to secure it and then caulked around every edge, hoping to prevent any misplaced water from ruining the subfloor in the future. I like the sheet vinyl option for this camper because its light, flexible, durable, and easy to clean. The wood look isn’t my first choice for a home interior, but for the camper, it brought a lot of warmth at the end. I’m super happy with it.
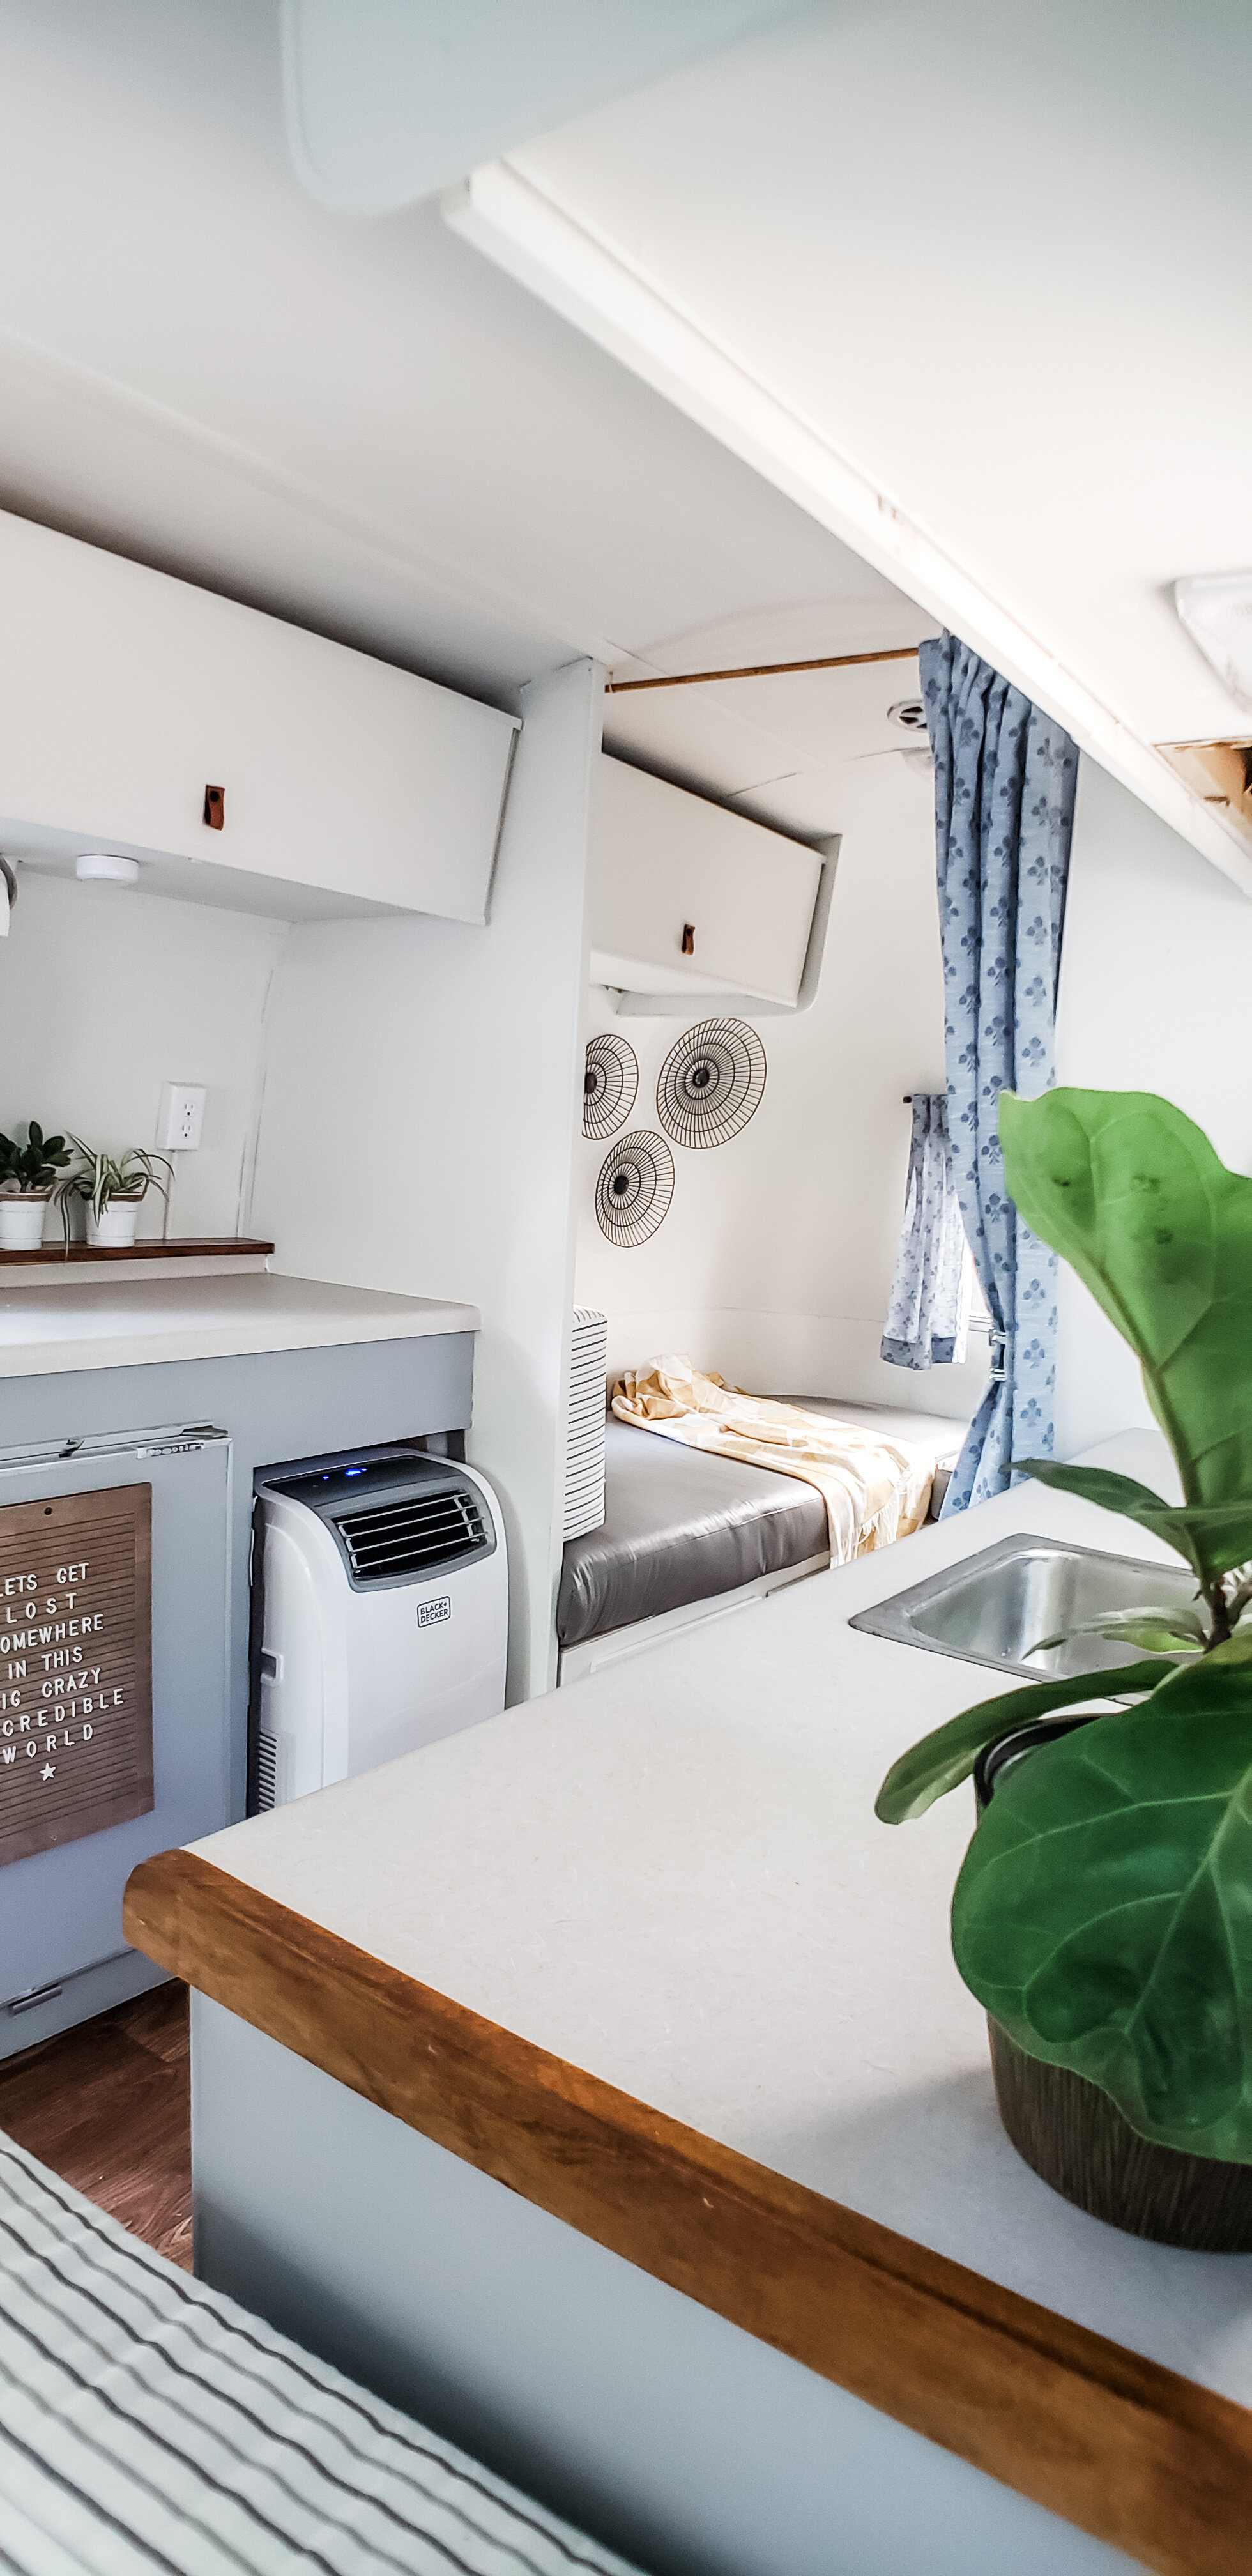
A lot was done a bit out of order. Mostly because I would start on a project without realizing that I had another issue to deal with and then I’d abandon it until the new problem was dealt with. We primed the interior walls (the original textured vinyl was were a yellowed almond color) in an Extreme Bond Primer by Sherwin Williams. I DID take out the rivets in several areas to check the interior insulation to be sure there was no mold or other concerns, and thankfully, didn’t find any. So simply painting the original wall coverings worked plenty fine for our needs. We ended up painting all the walls and upper cabinets in white, which I don’t have a name for because I literally just dumped a bunch of leftover white paints from our house interior into a 5 gallon bucket and used that. Its just a basic bright white. I wish it were slightly creamier but beggars can’t be choosers and I was determined to keep costs down where possible. The kitchenette cabinets were painted in a medium gray (also a DIY color mixed from leftovers). The paint definitely did wonders to update the look of the thing and brightens it up tremendously.

The tiny bathroom had at one point a curtain and the closet next to it had a door that swung out into the walk space. I wanted something that didn’t interfere with the path between the bench and bath area so I used a bypass closet door kit to install to DIY’d doors I made from plywood, trim pieces, and a waterproof textured panel (on the inside facing the bath so showering doesn’t damage them). They now work really well and don’t get in the way.
Where the heater used to be under the right countertop, we installed a portable A/C-Heater combo unit. It worked out perfectly because there was already a vent to the outside and a drain hole from the old heater, perfect for the needs of the new unit. I slightly modified the cabinet base to accommodate it and we used a dryer vent cap on the outside to prevent rain water from running in through the vent hose. I love the A/C we chose because it is on wheels and we can kind of roll it out and point in in whichever direction needs more cooling off (or heating up). But honestly, it runs like a beast and cools and heats the whole 21’ airstream with ease. And it was gobs cheaper than getting a roof-mount unit. We simply use a bungee cord to secure it while on the road.
We took out the old range because we couldn’t foresee a time when we would ever want to “bake” in the camper, and we have plenty of other options available for cooking easily using a camp stove, or electric skillet. Also, it just took up SO MUCH precious counter space and we figured we’d rather have that. Instead, we bought a small microwave that fits nicely under the counter in the spot where the oven used to be. This is my FAVORITE decision (other than building bigger beds) because we can pre-make meals at home and bring them along and easily just heat them up in the microwave. Also those microwave cups of brownies are apparently delicious it turns out. In order to get the under-counter A/C and microwave working, I had to install new electrical outlets behind them, before installing the new counters. I used on-the-wall electrical kits from Home Depot and it was really easy to create new outlets for those units using those. I felt like an electrical wizard.

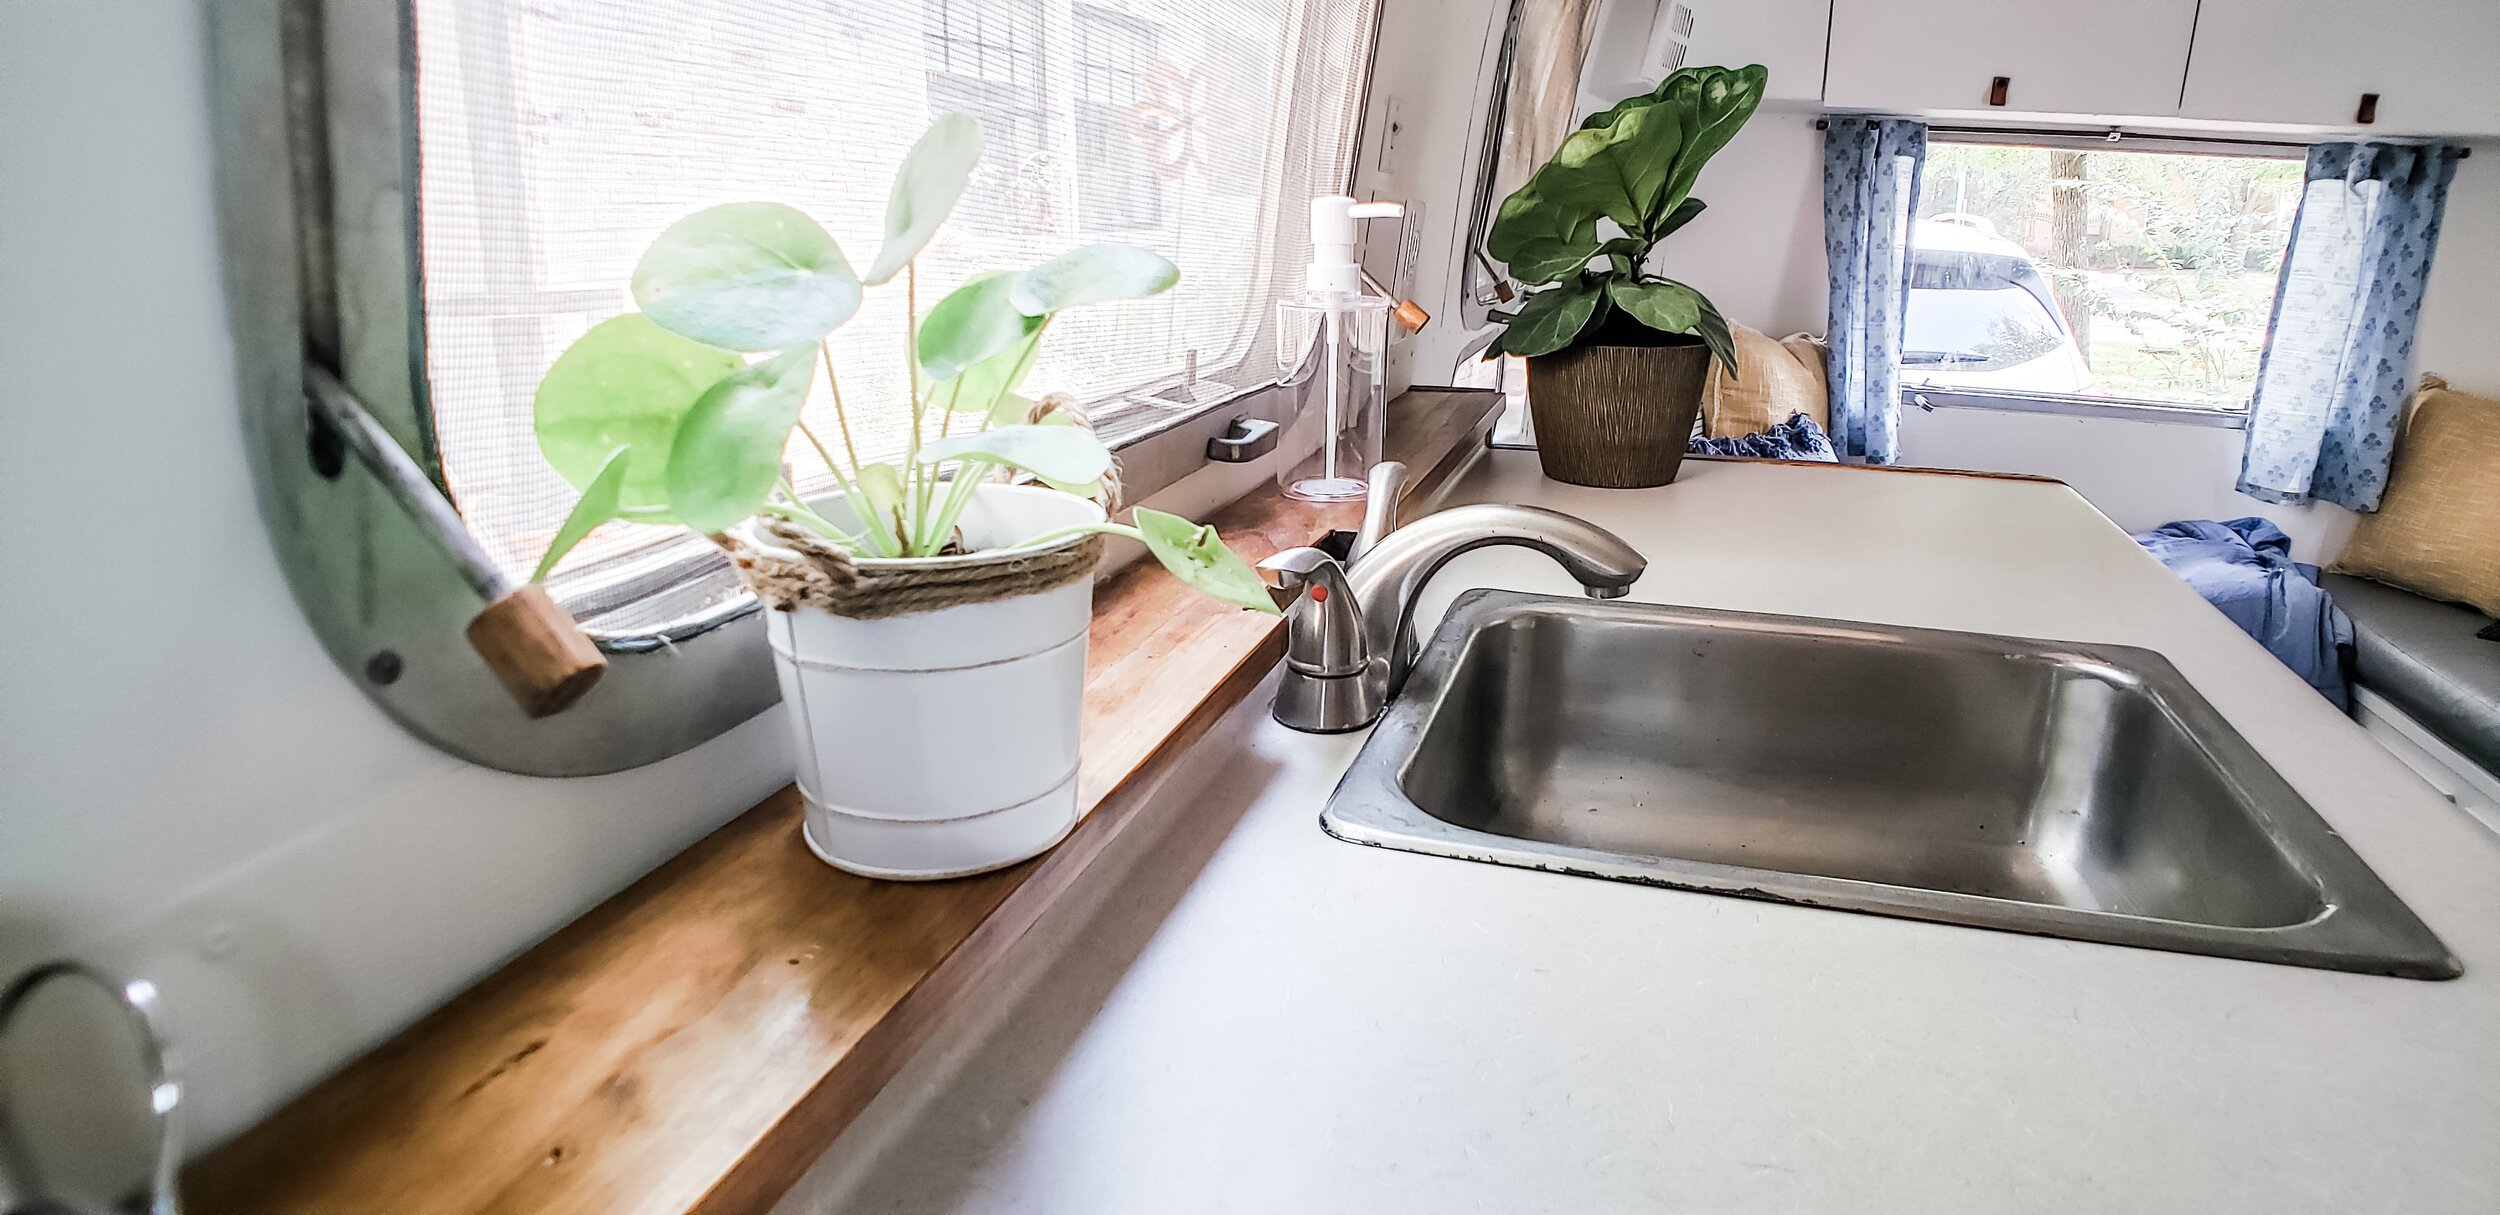
I bought cheap remnant counters (formica over particle board in a simple light gray) off a guy on Facebook Marketplace for $60. The airstream is weirdly shaped and the left and right cabinet bases are different depths. I knew I’d need to finagle a solution but it was worth it to not spend a gazillion dollars on custom counters. After looking at it for a while, I decided that I’d cut the back splash down to an inch (it was about 3 inches high and would have been in the way of the window above the sink) which I did with help from the hubby on the table saw. Then, to fill the gap between the end of the counter and the wall (which was about 3” on one side and 2” on the other) I simply cut and stained some 4x1 pine boards (stained to coordinate with the flooring color) and used them to create a small ledge-shelfy-thingy. It solved my problem and also ended up being pretty functional as a place to put my spice rack and a good spot to set phones, up out of the way of the usable counter space. I also used boards cut and rounded to finish the raw ends of the counters on either side.
The small original side lights were very yellowed but still functional, so I simply primed them with spray primer and then spray painted them black. I also used the same black spray paint to paint large bolts that I used to create leather cabinet pulls. The leather was about $18 on Amazon and I only used about half of it. A good, cute DIY that is not only cheap, but charming.
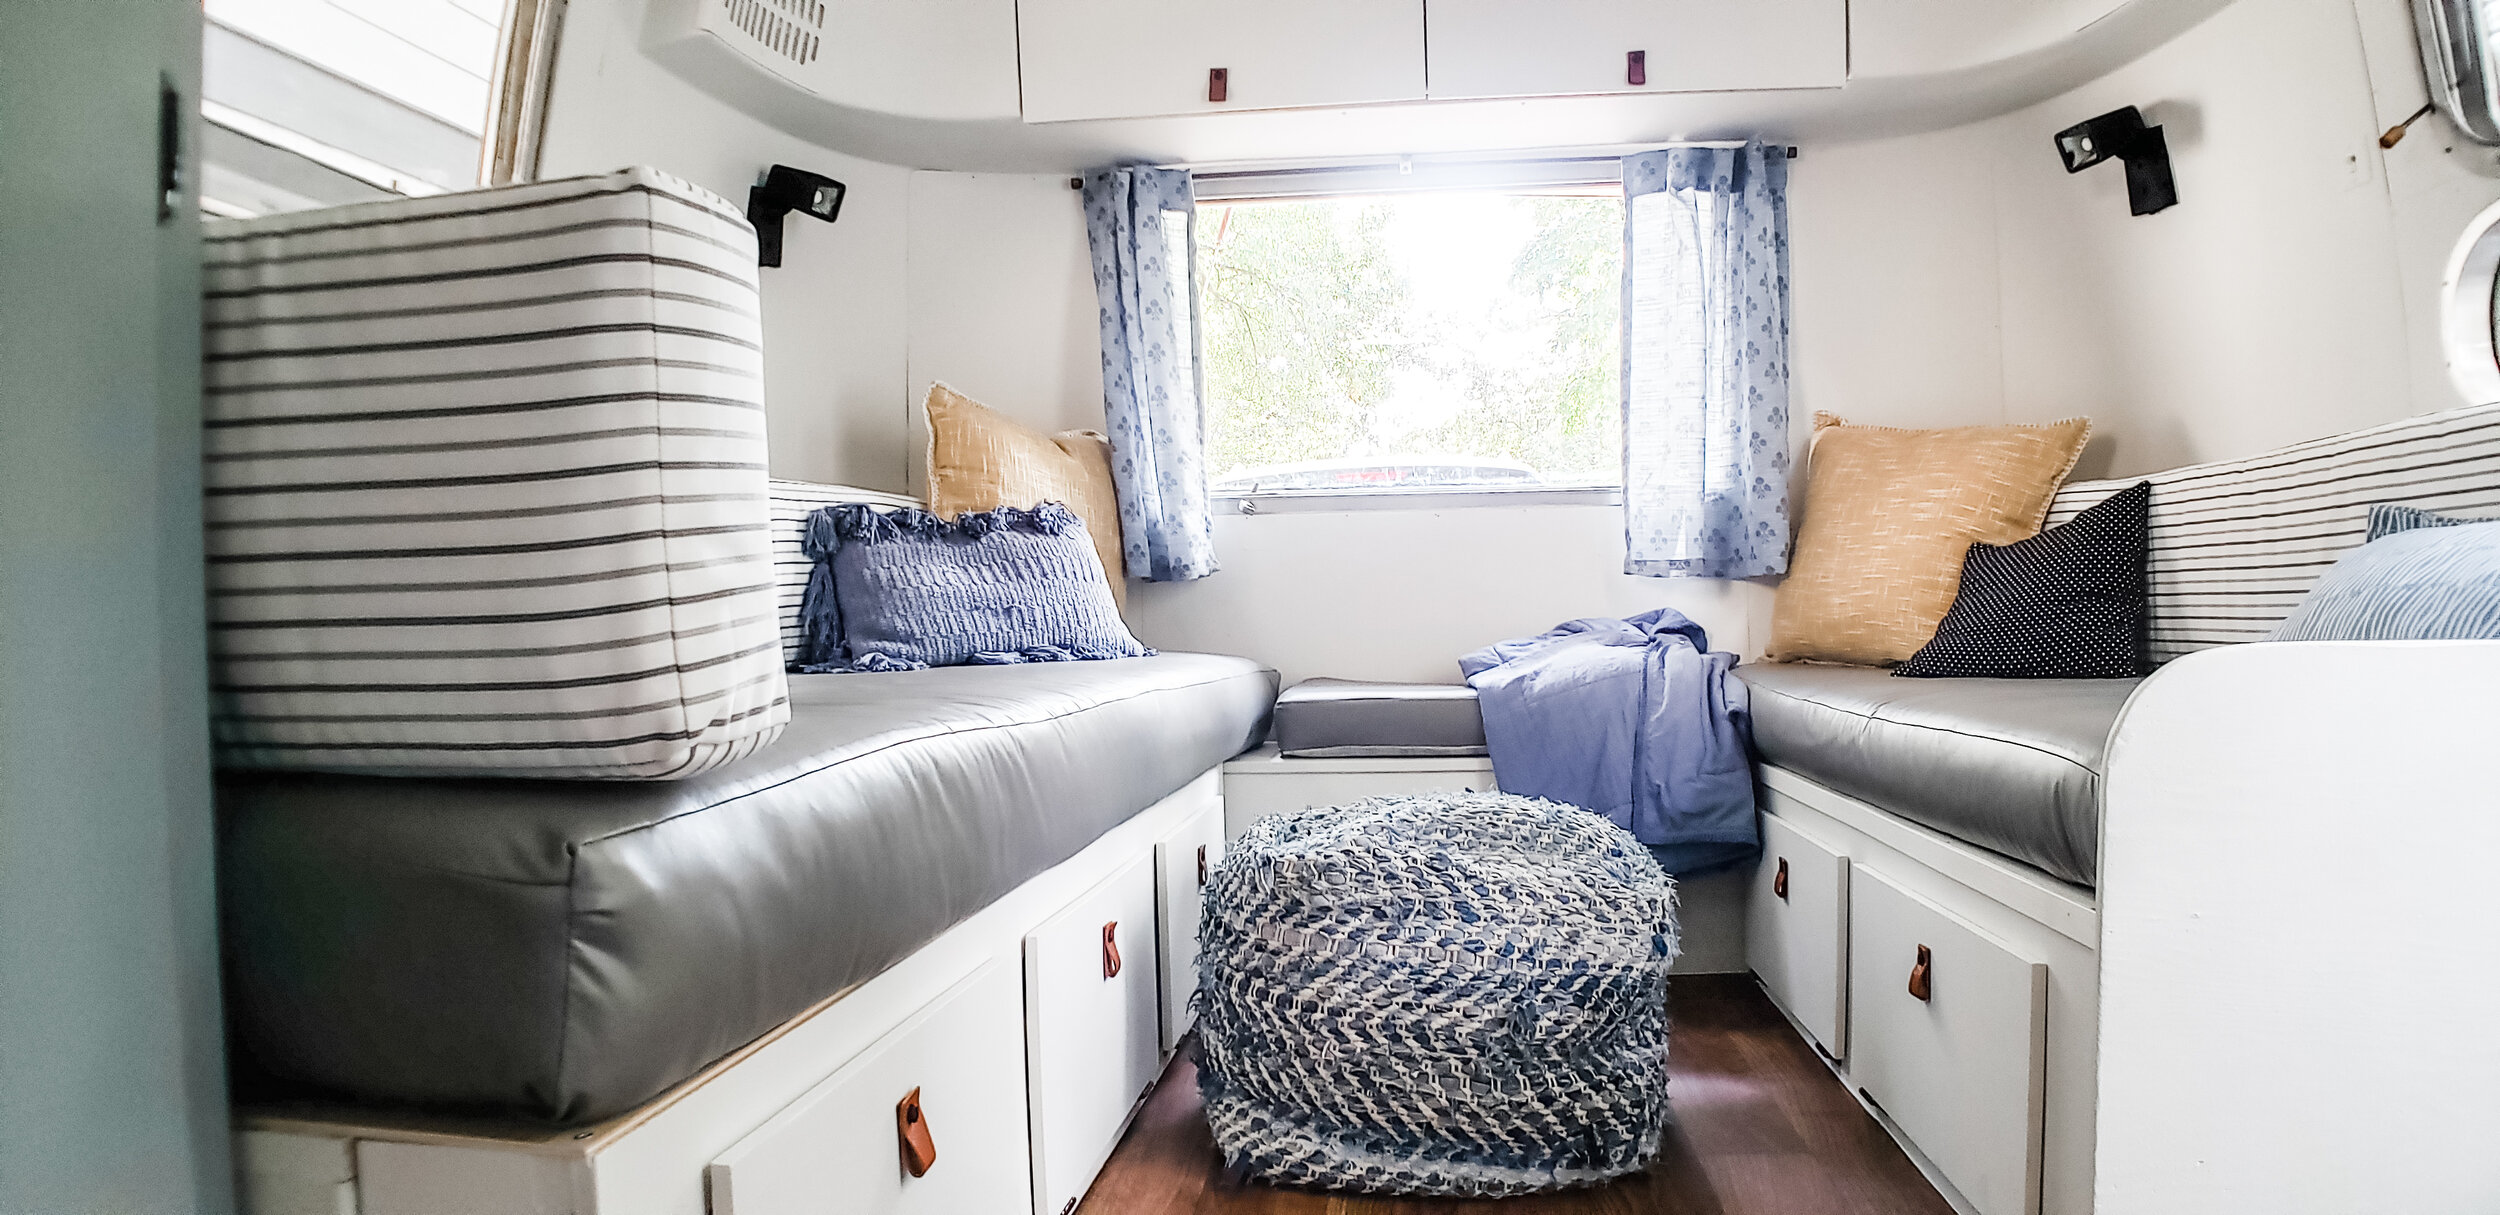
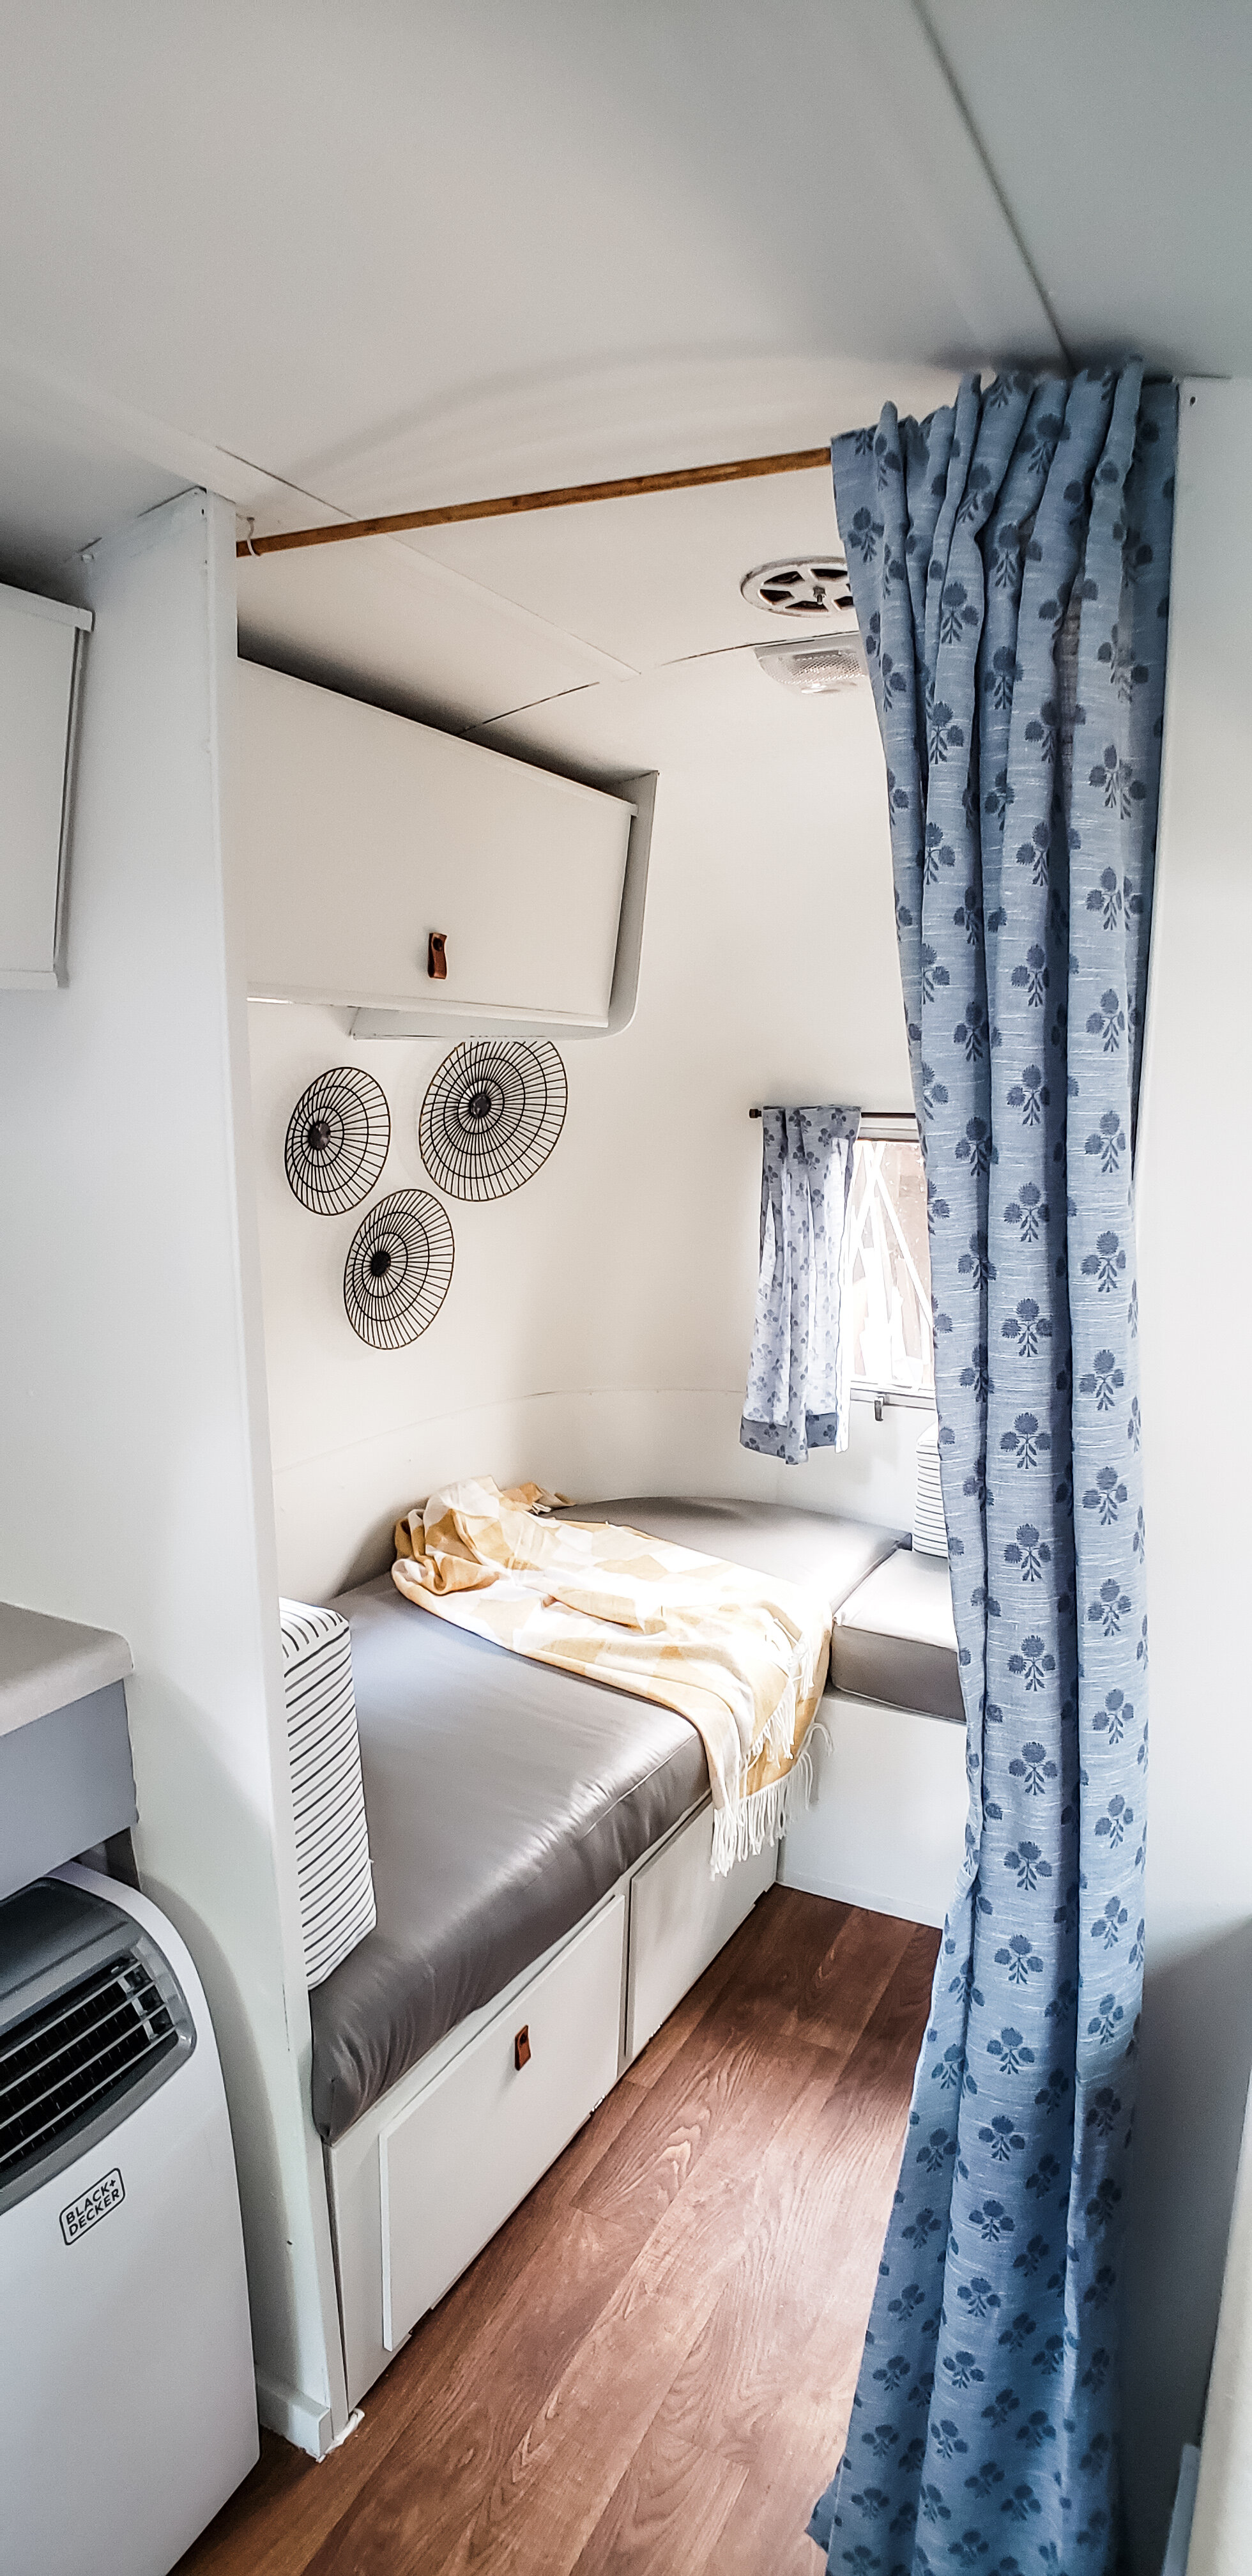
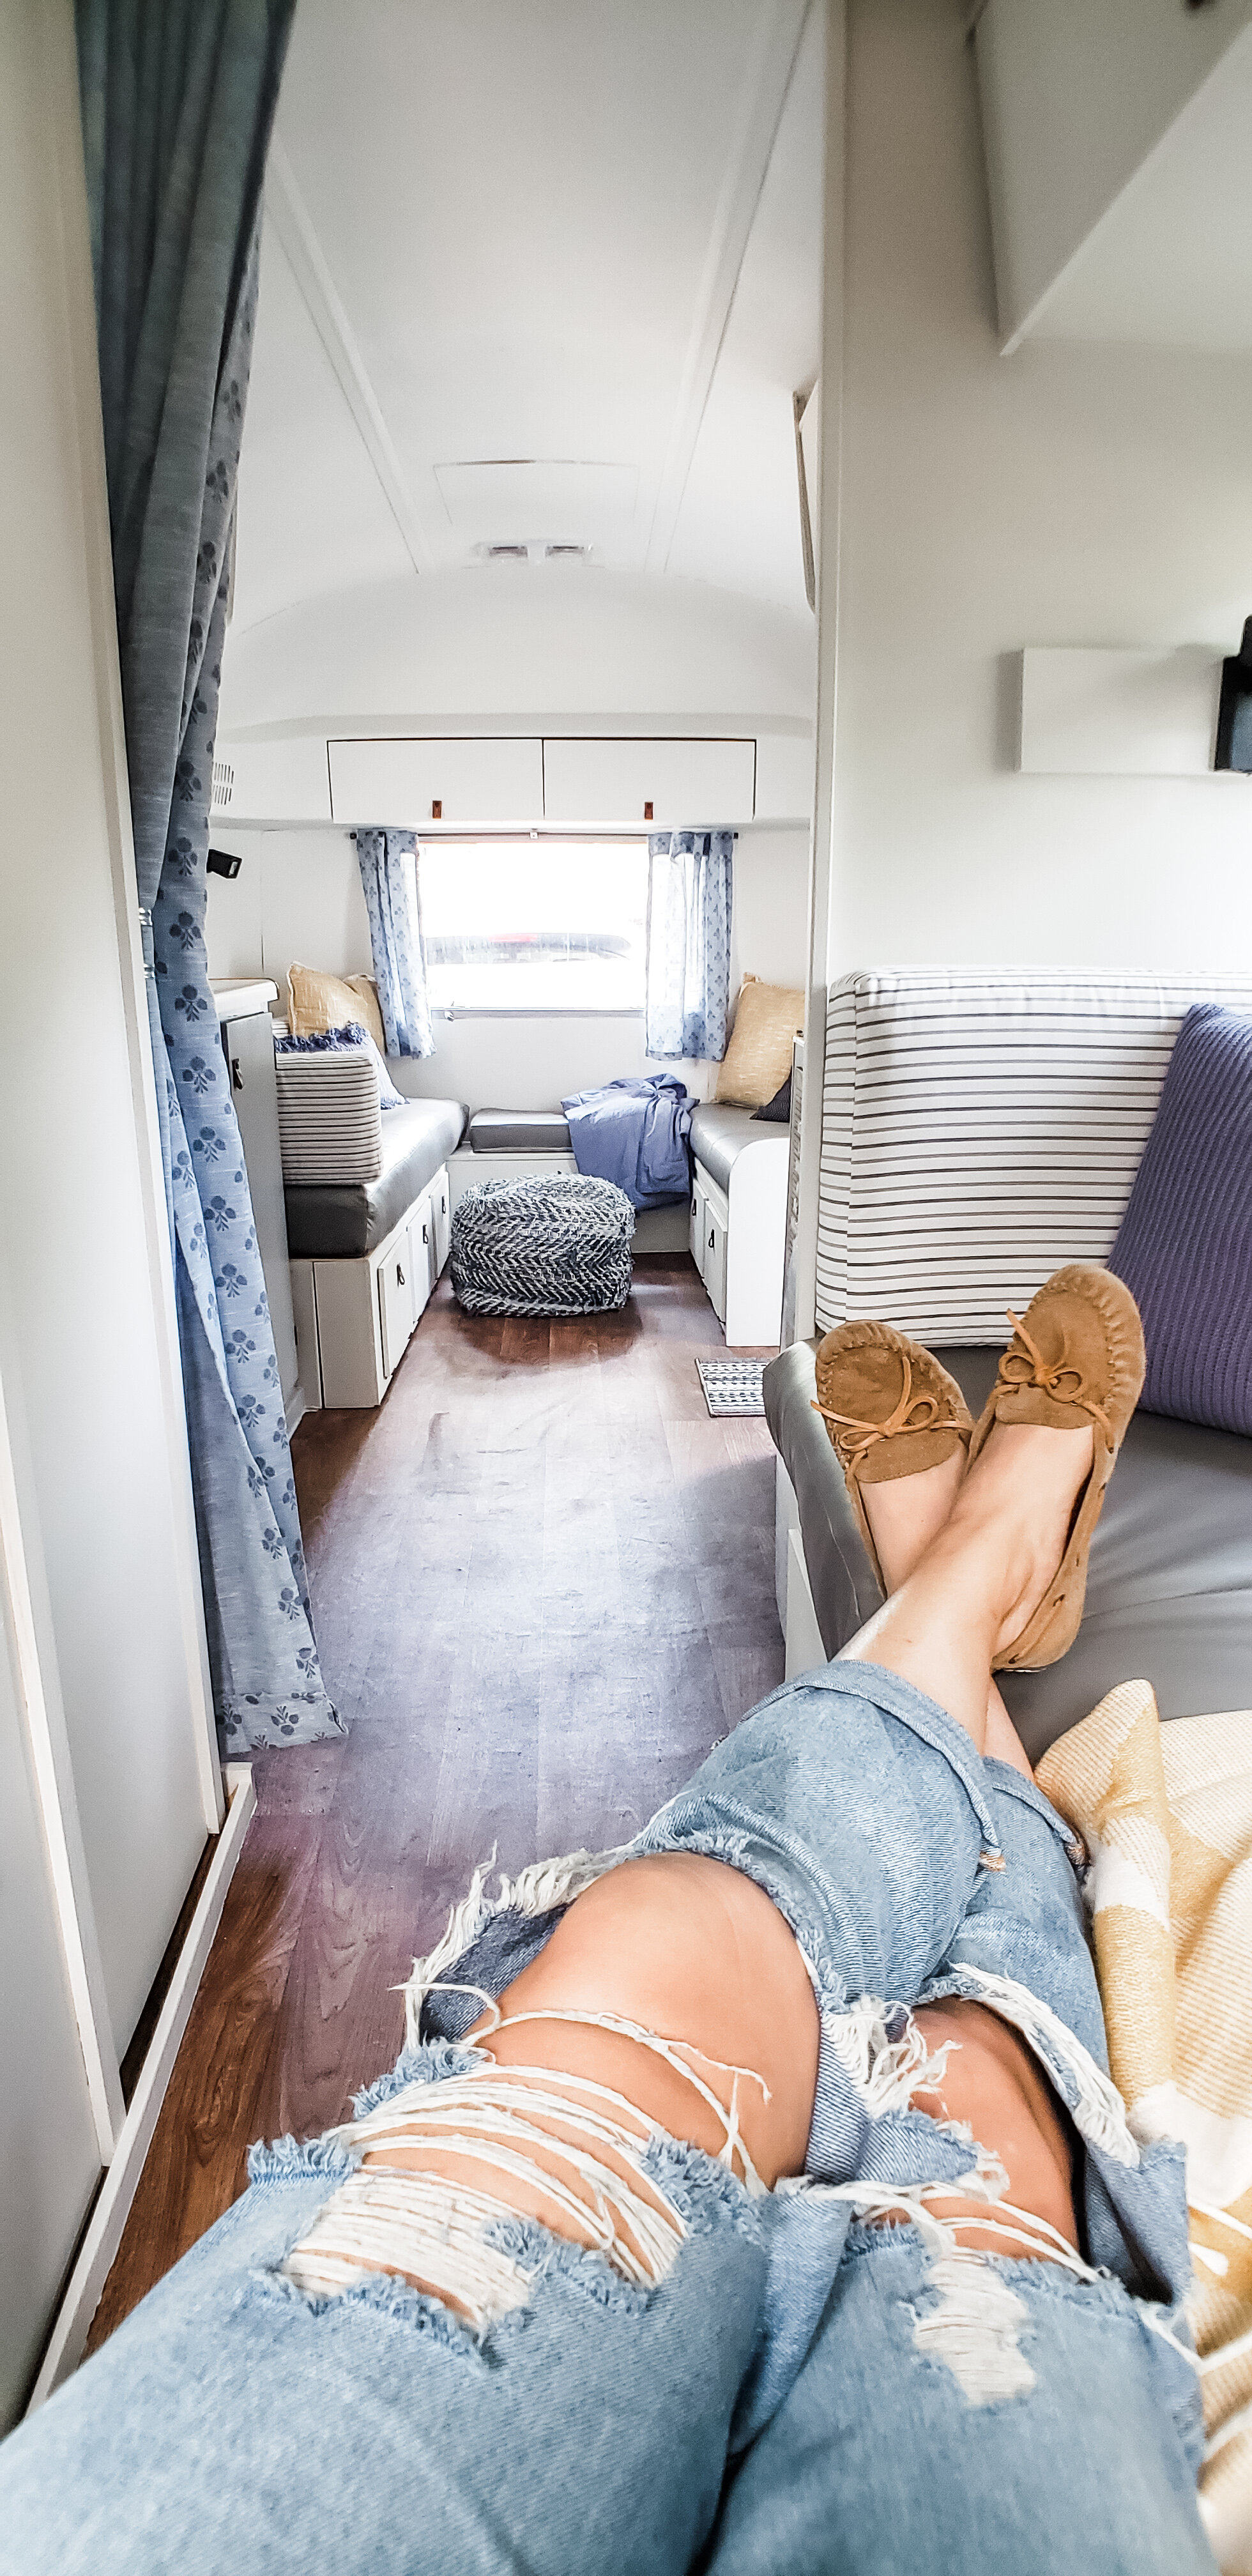
One of the biggest issues I needed to tackle was the lack of beds. There are 5 people in my family and we all needed to fit (hopefully comfortably) in this little 21’ camper. Originally the camper had a futon thing in the back that pulled out to be close to a full-sized bed and then the front dinette could be used as a twin. My grandpa hated the futon so he had taken it out long ago and built out a platform to fit a custom made mattress. The issue with that for me is that one, it was ugly, two, it had no way of folding away therefore giving you about one thigh worth of space between it and the bathroom. Also, it made the under bed storage compartment basically unreachable. So I took it out, and converted it back to its original size, but including now a pullout portion that can extend the bench to a size roughly between a full and a queen. When not sleeping, it slides back in, flush with the front of the bench and storage underneath. It was a super smart idea that was not mine. I googled options until I found this one floating around, created by other smarter-than-me camper remodelers.
I also created the same thing in the front of the camper with the dinette bench. Knowing that would be where my husband and I would sleep I opted for a complete queen size and after sleeping in this thing many nights now, I don’t regret it. When not a bed, it makes for a very roomy sofa to lounge around on. One large adult could sleep on it in its not-extended form. Lastly, the right side bench near the door needed very few modifications to transform it for sleeping. It is too short as a bench to be comfortable so I simply out the wooden arm rest on a hinge with a leg that drops down when lifted so that it extends the length to be closer to a twin. Then it was like cushion Tetris trying to figure out a decent way to get enough cushions in all the right spots that could be used to fill in as mattresses once the pullouts were extended. But I think I made it happen. I used some of the original foam (the parts that were not moldy) and then bought a cheap foam IKEA mattress to fill in what was missing (a less expensive option than buying 5” upholstery foam). I used inexpensive fabric (gray vinyl on the seats and a striped gray and white outdoor fabric on the back and side cushions and sewed and upholstered every last cushion. Next to plumbing, my least favorite part of this project for sure.
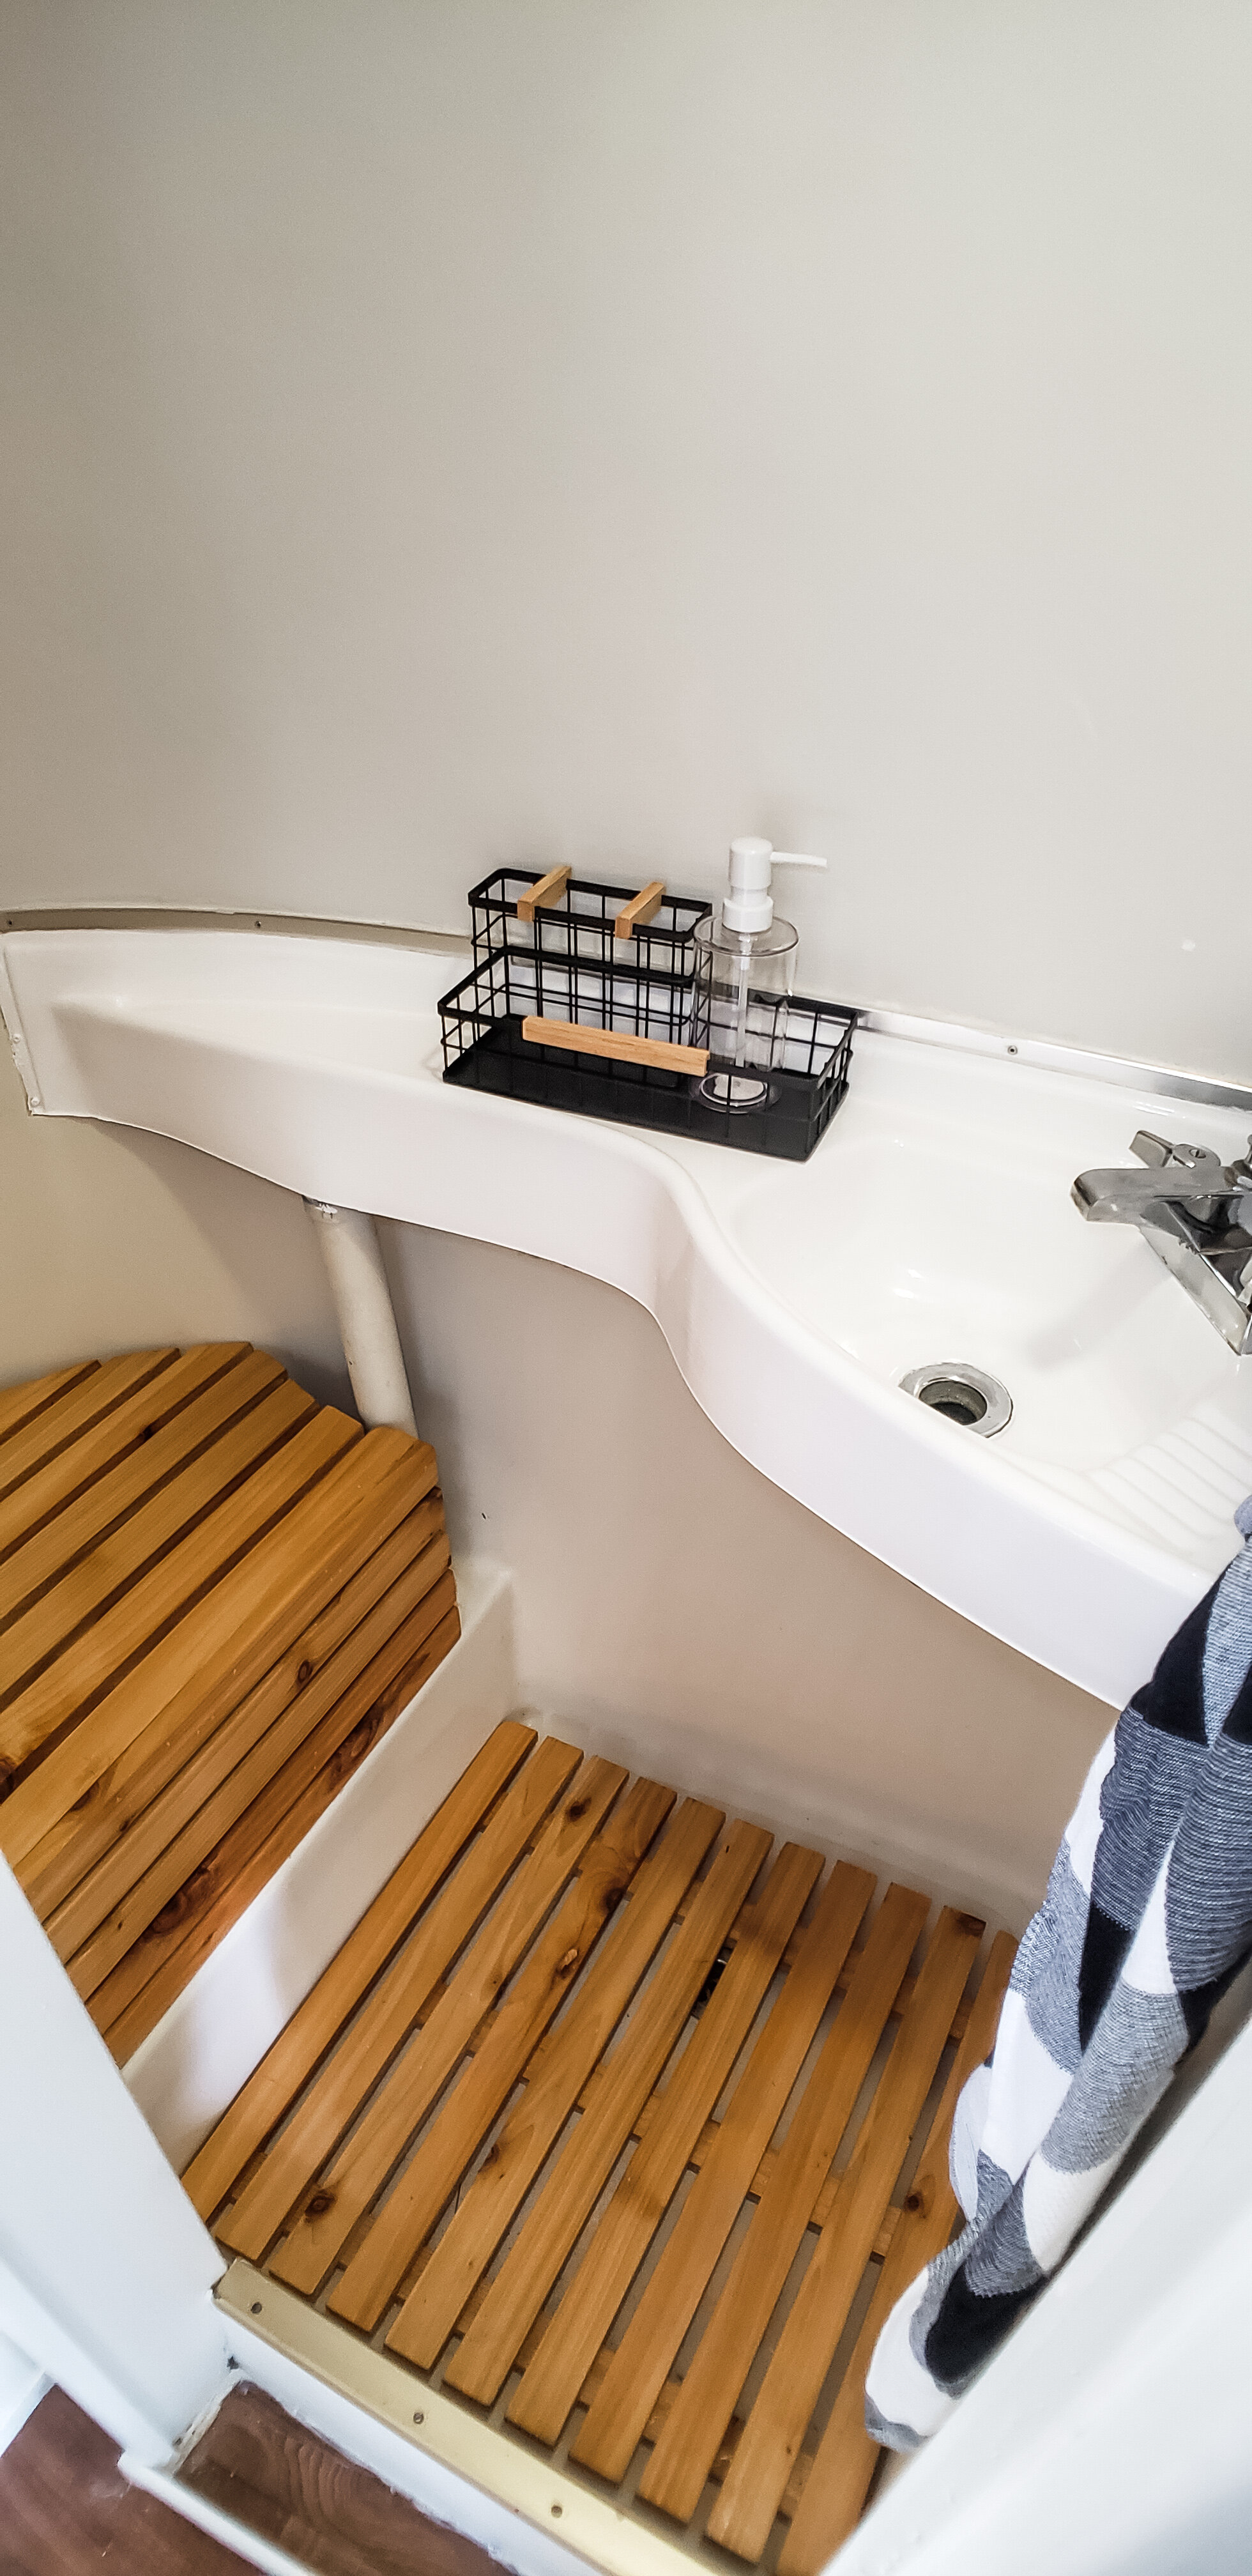
The bathroom got a coat of paint, even on the sink which was VERY yellowed old plastic. I used the tub and tile refinishing kit from Rustoleum to bring it back to bright white. The floor was really beat up but I didn’t feel like messing with it and instead decided to build a custom DIY cedar shower mat and matching little bench to go where the toilet once was. Side note: having no septic in this thing has worked out fine as we so far have only camped at places with bathrooms and also have perfected the art of peeing in the woods. I’m glad to not have to worry about septic smells and the nuisance of disposal.
I cut 2 wide cedar boards into strips and used spacers in between. Then I used the nail gun and wood glue to assemble and finished it off with Teak Oil. These little bits have done wonders to make the bathroom feel at least a little inviting and functional. I like the cedar mat so much I think I might make one for friends and family and give them as Christmas presents. So fancy!
To fix and prevent further leaks, I scoured the thing inside and out for holes or lose seams. I recaulked around all the windows and compartments on the outside and all along the vents on the roof. I also used clear Flex Seal spray and sprayed it along every single exterior seam. Butyl tape was a life saver and helped to cover the holes from the inside giving even more sealing power. So far, its all seemed to have worked as I’ve yet to see a leak even in this insane Houston weather.
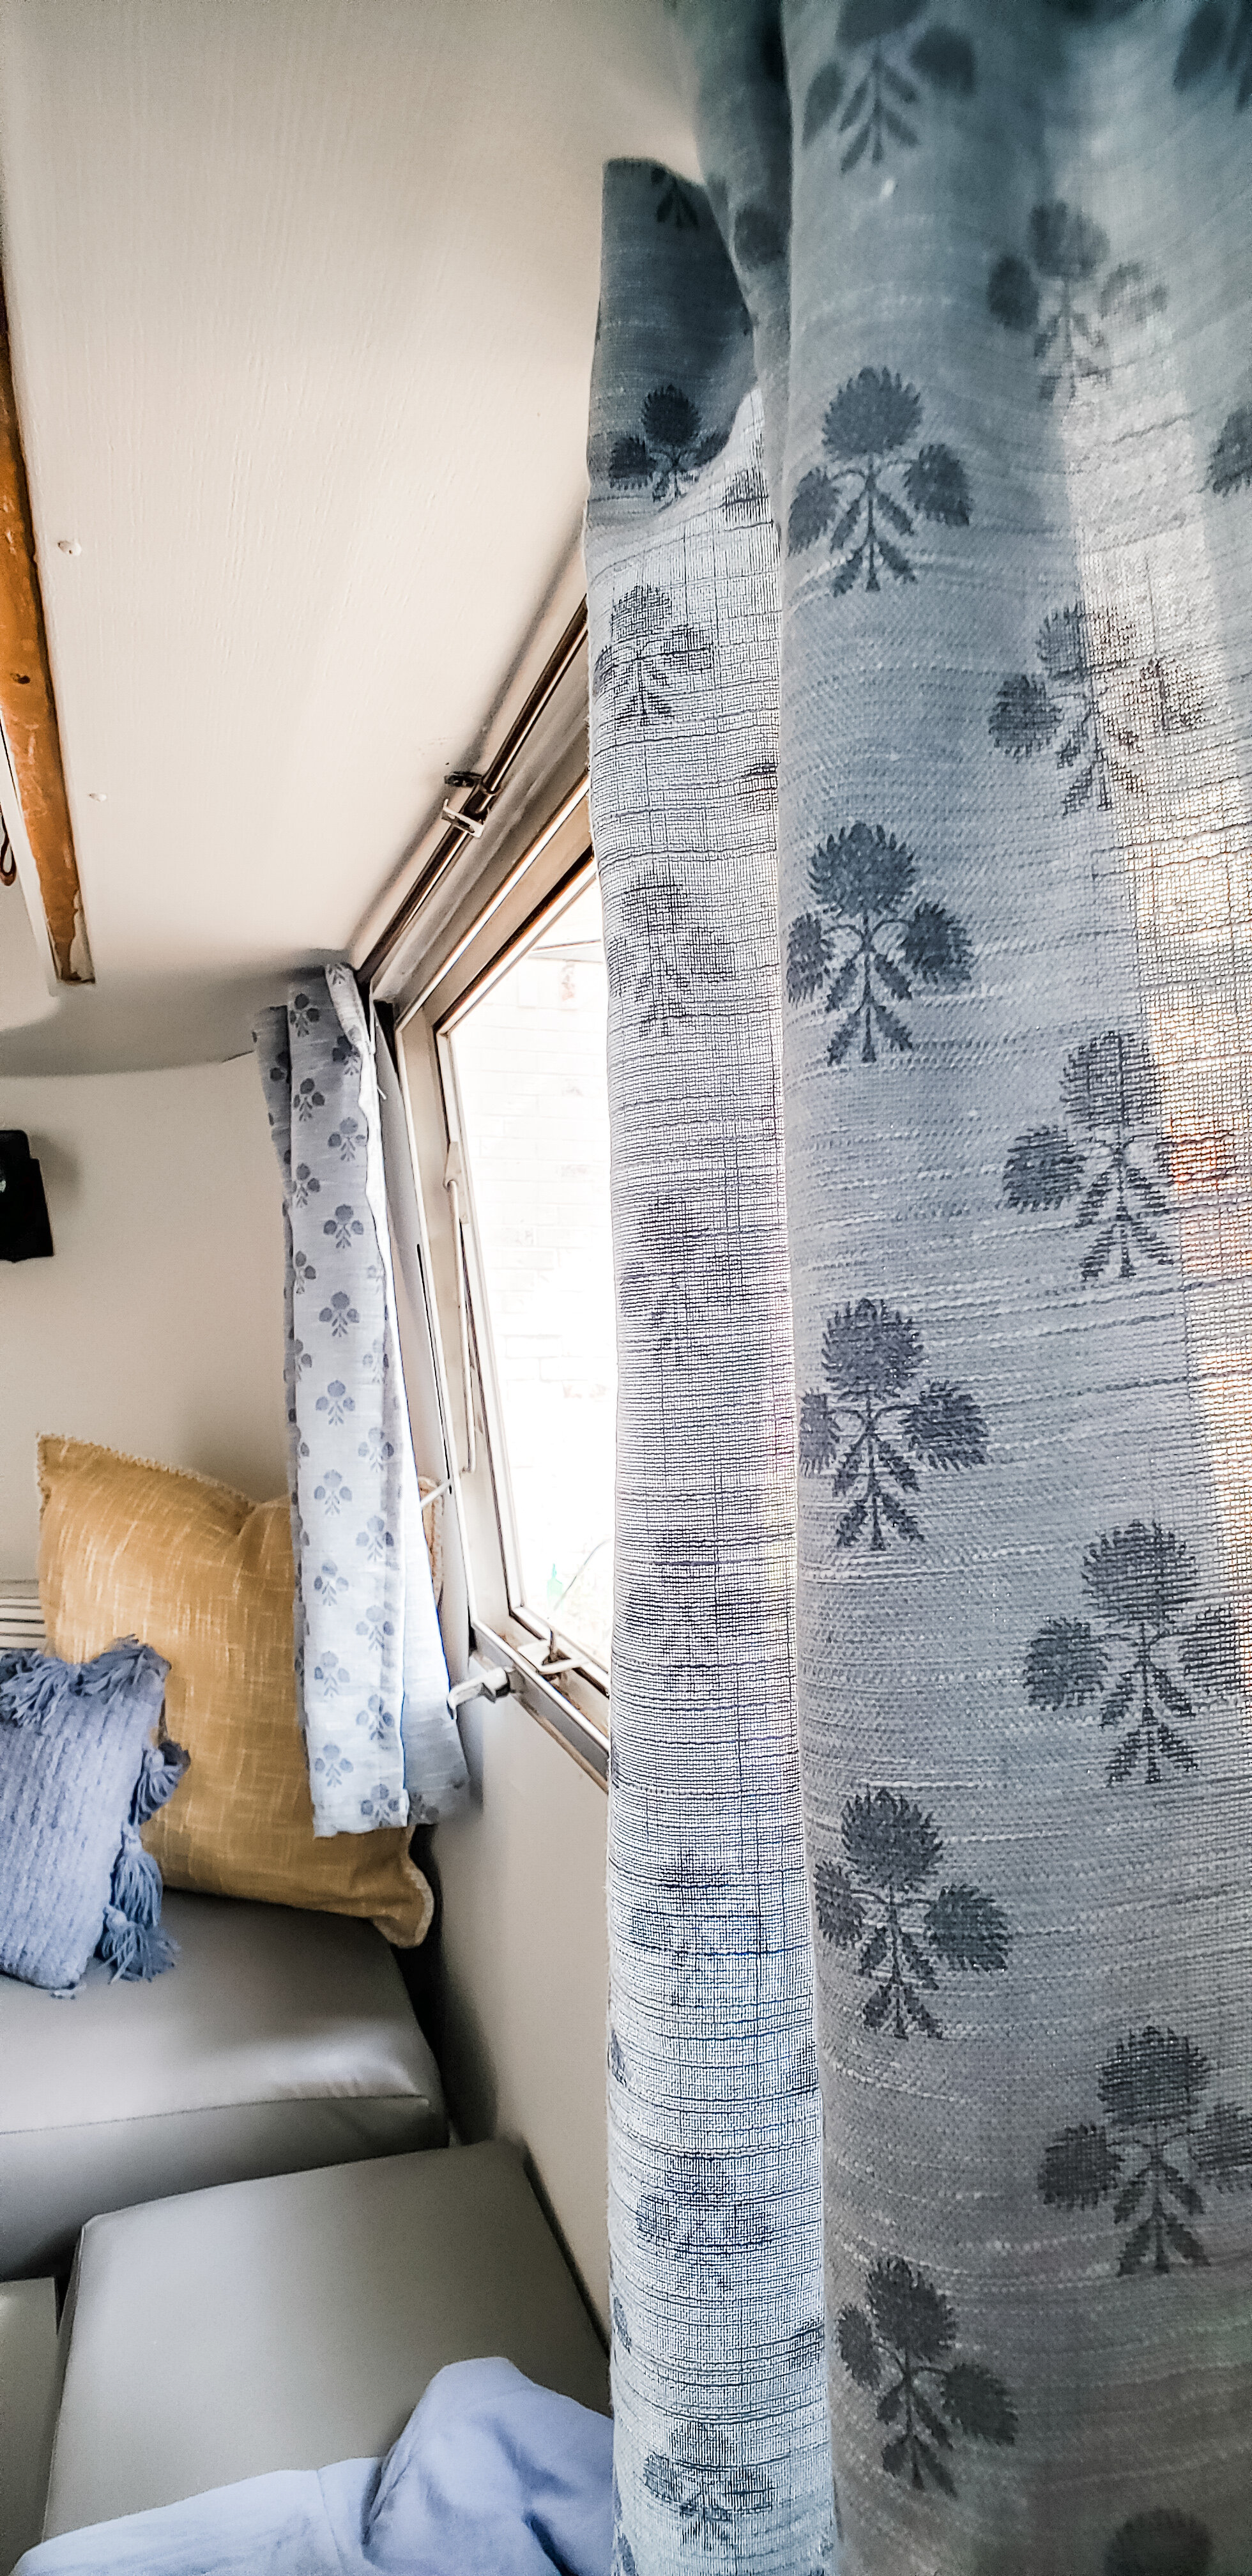
For finishing touches, I installed roller shades on the side windows and found a pair of unused curtain panels in my fabric drawer to make curtains for the front and back windows as well as a divider curtain for the back “room”. I have a very private son who WILL NOT change in front of people so that one was for him. The curtains added some color and texture and helped make the space feel much more homey.
Also, now I thought I was a legit GENIUS for this one, the little plastic nobs that used to be on all the window lift sticks (don’t know what they are really called but thats what they are) were either gross looking or missing, creating a hazard because that left sharp metal things sticking out into the backs of people’s heads while sitting around on the benches. I got wooden dowels and cut them down to little chunks that I then drilled holes half way through. I stained them and used epoxy glue and a cue tip to adhere them to the ends of all the little window lift sticks. They’re cute and don’t hurt your head! Seee…. I AM a genius. Right?
There are still definitely things I need to do to really make this baby shine, (like weather-stripping, dent popping and shining the exterior) but for now, it is cute and homey and functional and we have already taken it out. It has weathered the beach, and the woods, hot days, cold nights, and one torrential downpour without disappointing. My husband even agrees that its the best crazy idea I’ve ever had! Our goal is to get away in the “Little Debbie” (the name I gave her since she reminds me of a snack cake and “Debbie” just so happened to be a very popular girls name in 1969), once a month and so far we have kept to that goal. Needless to say, it was insanely hard work, I had blisters and bruises for weeks after I finally finished it up, but completely worth it to save our COVID fatigued sanity.